Granite surface plates are the bedrock of precision measurement in many workshops and labs. Their inherent stability and flatness provide the essential reference plane for accurate metrology.
These indispensable tools are fundamental in manufacturing, inspection, and calibration processes, ensuring components meet stringent dimensional tolerances. The longevity and reliability of a surface plate directly impact the quality and consistency of precision work.
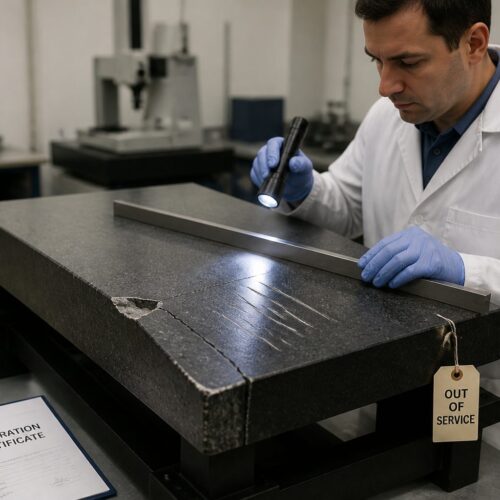
A small chip might seem insignificant, but it can compromise the plate’s integrity and potentially affect measurement results. Even minor surface imperfections can introduce errors, leading to costly rework or rejected parts.
Knowing when and how to perform a DIY minor granite surface plate chip repair can save you time and money. Proactive maintenance helps preserve the plate’s certified accuracy and extends its operational lifespan.
This guide helps you decide if a chip is fixable yourself, walking you through the process. Understanding these steps ensures your small granite chip repair contributes to the longevity and reliability of your equipment.
By carefully following these instructions, you can confidently address minor damage, keeping your precision operations running smoothly. Proper repair techniques safeguard your investment and maintain the high standards required in metrology.
Understanding the Impact of Chips on Surface Plate Accuracy
A granite surface plate’s primary function is to provide an exceptionally flat and stable reference plane for precision measurements. Even a seemingly minor chip can disrupt this critical flatness, especially if it occurs on the working surface.
The integrity of the plate’s surface directly influences the accuracy of all instruments placed upon it, from height gauges to electronic indicators. Any deviation from perfect flatness introduces a systematic error into your measurements.
These errors can propagate through your manufacturing or inspection processes, costing you rework and lost production. Maintaining the integrity of your surface plate is therefore paramount for consistent quality control.
Chips, particularly those on the immediate working surface, create localized high or low spots. These imperfections mean that instruments will not maintain a consistent contact plane, impacting measurement reliability.
When an instrument encounters a chip, it may rock or tilt slightly, causing its measurement probe to register an incorrect value. This subtle instability can be difficult to detect without careful inspection, leading to unnoticed inaccuracies.
The problem compounds when using height gauges or indicators that rely on a perfectly flat datum. A small chip can cause an instrument to tilt, introducing measurement variability.
Furthermore, chips can act as collection points for debris, which can then scratch the underside of precision instruments or contaminate workpieces. This secondary damage further compromises measurement accuracy and tool longevity.
Even chips on the chamfered edges, while less critical, can still pose issues by breaking off further, leading to larger damage or creating sharp points. These can snag cleaning cloths or even cause minor injuries.
Ultimately, your surface plate’s accuracy directly correlates with the quality of your finished products. Investing time in DIY minor granite surface plate chip repair protects your investment and ensures trustworthy metrology.
By addressing minor damage promptly, you prevent small issues from escalating into significant problems that require expensive professional reconditioning. This proactive approach is a cornerstone of effective metrology lab management.
Distinguishing Minor Chips from Major Damage
Before attempting any repair, accurately assess the extent of the damage. Not all chips are equal; some demand professional intervention over DIY minor granite surface plate chip repair.
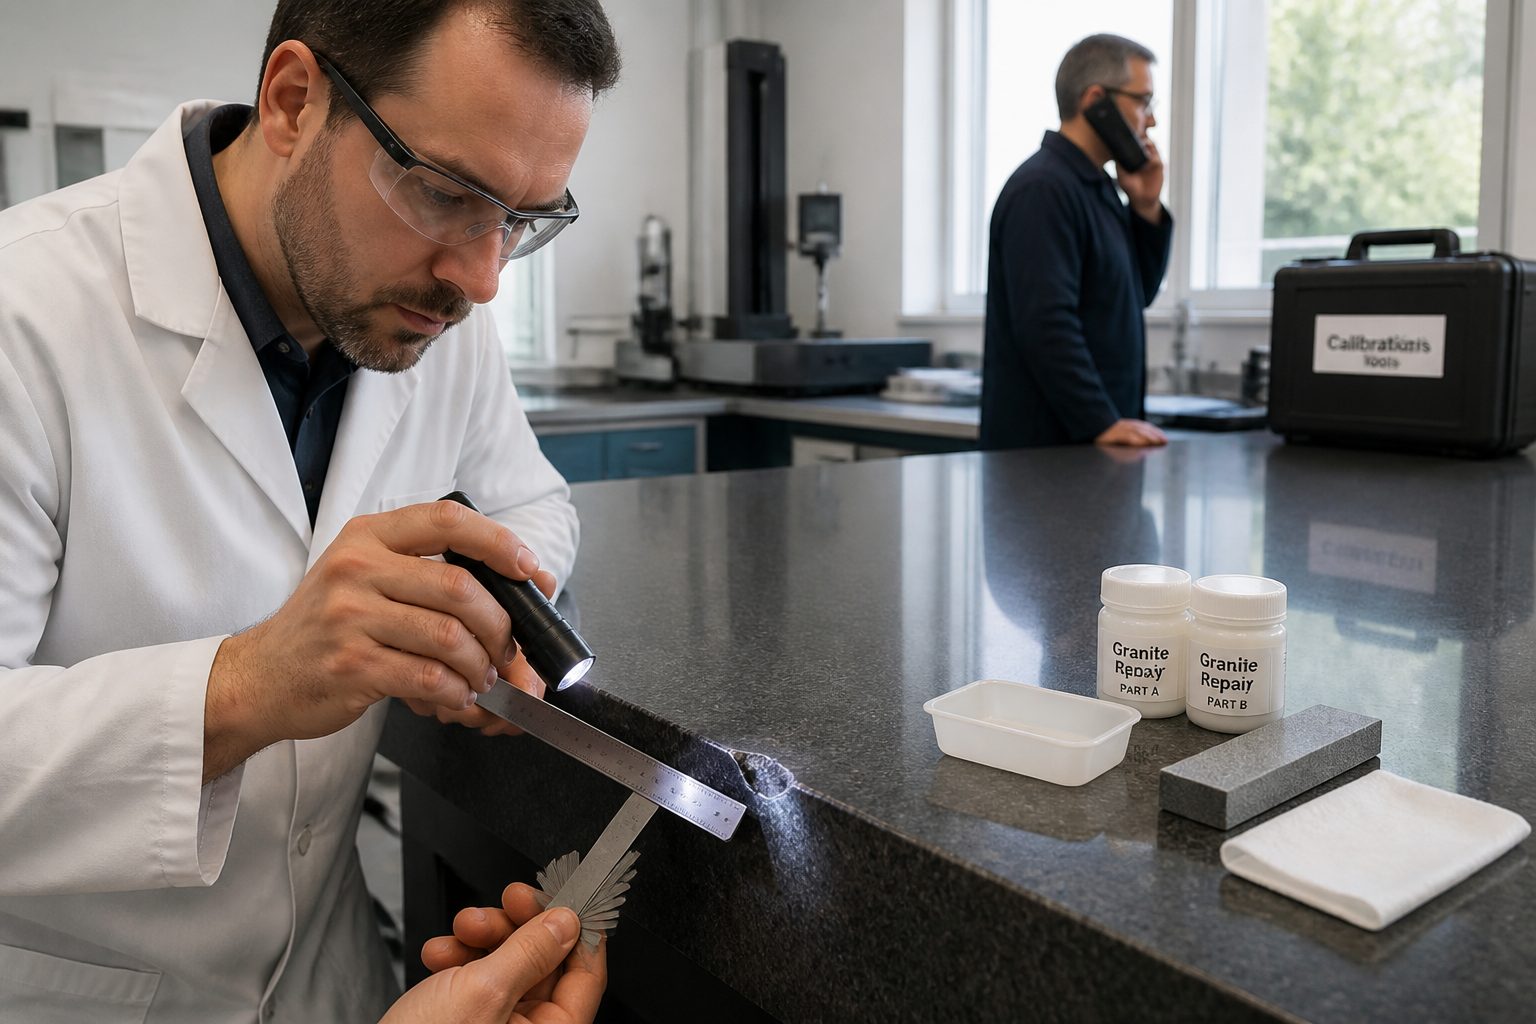
A careful visual inspection is the first step, ideally performed under bright, focused lighting to reveal subtle imperfections. Running a fingernail over the area can also help gauge depth and sharpness.
A minor chip is typically small, superficial, and often located along the edge or in a non-critical area. These usually involve only the top granite layer, not compromising underlying structural integrity.
Such chips might be a few millimeters in diameter and depth, primarily affecting the cosmetic appearance or the very outermost boundary of the plate. They do not typically extend into the core material or across a significant portion of the working surface.
Major damage, conversely, involves deeper gouges, large missing sections, or cracks extending into the plate’s core. Such damage significantly alters overall flatness, making accurate measurements impossible.
Look for chips that are wider than a pencil eraser, deeper than a few millimeters, or show signs of propagating fissures. These larger defects often indicate a more serious structural issue that DIY methods cannot adequately address.
A good rule for minor damage is its depth and location, usually less than a few millimeters deep on a chamfered edge or corner. If it’s deeper, wider, or in the central working area, be wary.
Cracks, regardless of size, are almost always considered major damage because they can spread and compromise the plate’s fundamental stability and flatness. Even hairline cracks warrant professional assessment.
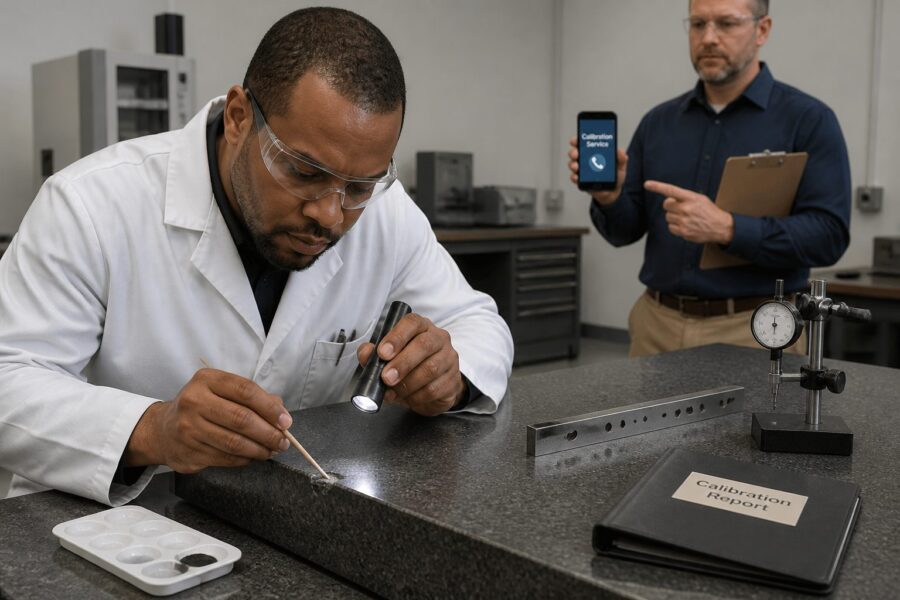
Always examine the chip closely with good lighting and a magnifying glass. Feel the area to gauge its depth, helping you decide on a simple fix or expert advice for serious surface plate edge damage.
Understanding these distinctions prevents you from wasting time on unfeasible repairs and ensures the correct course of action is taken to maintain your surface plate’s precision. When in doubt, err on the side of caution and consult a professional.
When DIY Repair is Acceptable (and When It’s Not)
Deciding when to perform a DIY minor granite surface plate chip repair versus calling a professional is a critical judgment. You can generally tackle repairs for chips that are small, shallow, and located away from the primary measurement zone, like chamfered edges or corners.
These minor repairs are primarily cosmetic or preventative, aiming to smooth rough edges and prevent further material loss. They are typically not intended to restore metrology-grade flatness to the exact point of the repair itself.
Such repairs aim to restore appearance and prevent further chipping, not necessarily metrology-grade flatness to the exact spot. If the chip is deep, wide, or directly on the critical working surface, DIY is usually not the answer.
Attempting to fix major damage yourself can inadvertently worsen the problem, potentially creating larger imperfections or compromising the plate’s overall integrity. The specialized equipment and expertise of professionals are essential for significant repairs.
For chips located within the central 80% of the surface plate, which is the most frequently used and critical measurement area, even minor damage should be approached with extreme caution. Any DIY repair in this zone risks introducing new flatness errors.
If the surface plate has a certification, any repair, even minor, might necessitate re-certification by a qualified metrology lab. This ensures that the repair has not negatively impacted the plate’s specified accuracy.
Consider the value of your surface plate and the criticality of the measurements it supports. For high-precision applications, even seemingly minor damage might warrant professional assessment to maintain absolute confidence in your metrology.
| Damage Type | Location | DIY Feasibility |
|---|---|---|
| Small, shallow chip (under 3mm deep) | Chamfered edge, corner, non-critical area | Yes, generally acceptable |
| Deep chip (over 3mm deep) or large missing piece | Anywhere on the plate | No, professional required |
| Hairline crack or spiderweb pattern | Anywhere on the plate | No, professional required |
| Chip on critical working surface (central area) | Central measurement zone | Highly questionable, professional recommended |
| Roughness or abrasion over a large area | Anywhere on the plate | No, professional required |
This table serves as a quick reference, but always use your best judgment and consider the implications of any repair on your specific measurement needs. When in doubt, a professional consultation is always the safest option for preserving your equipment’s value.
Essential Tools and Materials for Minor Chip Repair
Having the right tools and materials makes a significant difference in the success of your DIY minor granite surface plate chip repair. Gather everything before you begin to ensure a smooth, uninterrupted process.
Preparation is key, as scrambling for forgotten items mid-repair can lead to mistakes or compromised curing times. A well-organized workspace also contributes to a more precise outcome.
First, you need a suitable filler material; epoxy-based granite filler metrology grade products are ideal. They cure hard, bond well to granite, and can be sanded smooth.
Look for two-part epoxy resins specifically formulated for stone repair, offering high compressive strength and chemical resistance. These products are designed to mimic the properties of granite as closely as possible.
You will also need various sanding grits, typically starting with 220-grit and progressing to 400-grit or finer. Wet/dry sandpaper is preferable for a smoother finish and reduced dust.
A small, firm sanding block is crucial for maintaining flatness during the sanding process, especially when working on edges or chamfers. Avoid using your fingers directly, as this can create uneven spots.
For mixing and applying epoxy, small mixing cups, stirring sticks, and plastic spatulas are indispensable. Always wear appropriate personal protective equipment, including gloves and safety glasses.
Masking tape, preferably a low-tack painter’s tape, is useful for protecting the surrounding granite from accidental epoxy spills or sanding marks. This helps define the repair area precisely.
Finally, cleaning supplies like isopropyl alcohol or acetone with lint-free cloths are crucial for proper surface preparation. A good light source and magnifying glass help inspect the chip and repair work closely.
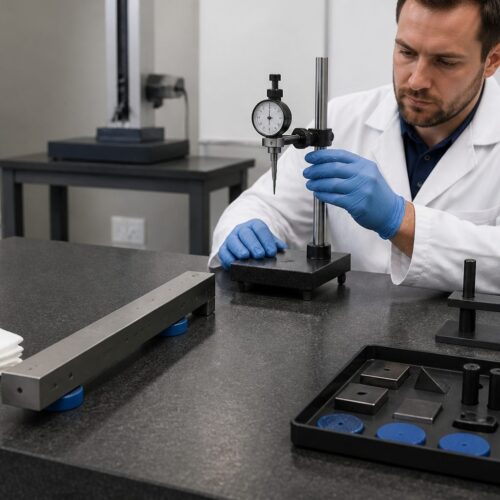
Having a precision straight edge or a small machinist’s square on hand can also be beneficial for a final check of the repaired area’s flatness. This helps verify the success of your blending efforts.
Step-by-Step Guide to Safely Repairing Small Chips
Performing a DIY minor granite surface plate chip repair requires patience and precision for a satisfactory result. Follow these steps carefully to ensure the repair is effective and minimally impacts your plate’s integrity.
Each stage builds upon the last, so resist the urge to rush, particularly during the cleaning, curing, and blending phases. A methodical approach ensures the best possible outcome for your valuable equipment.
Always prioritize safety, wearing protective gear and working in a well-ventilated area. Take your time with each step, as rushing can lead to difficult-to-correct mistakes.
Ensure your workspace is clean and free of dust or debris that could contaminate the repair area. A stable and well-lit environment is also crucial for precise work.
- Clean the chipped area thoroughly
- Mask off the surrounding granite
- Mix the granite filler metrology epoxy
- Carefully apply the epoxy to the chip
- Allow the epoxy to cure completely
- Gently sand the excess filler
- Progressively refine the sanded area
- Clean and inspect the repaired spot
- Verify flatness with a straight edge
After completing these steps, allow the surface plate to rest for a short period before resuming normal operations. This ensures the repair has fully settled and is ready for use.
Regularly cleaning your surface plate and inspecting it for new damage will help maintain its accuracy and prolong the life of any repairs. Proactive care is the best defense against major issues.
Remember that even a successful minor repair is a localized fix, and periodic professional calibration is still recommended for overall surface plate accuracy verification. This ensures your metrology remains trustworthy over the long term.
The Importance of Cleaning and Preparation Before Repair
Thorough cleaning and preparation are perhaps the most critical steps in any DIY minor granite surface plate chip repair. Skipping this stage almost guarantees a failed repair, as the filler will not adhere properly.
The success of the epoxy bond hinges entirely on the cleanliness of the granite surface. Any foreign substance acts as a barrier, preventing the chemical adhesion necessary for a strong, durable repair.
Any grease, oil, dust, or loose granite particles remaining in or around the chip will prevent strong epoxy bonding. This can lead to the filler delaminating, cracking, or simply falling out over time.
Even microscopic dust particles, invisible to the naked eye, can weaken the bond significantly. This is why a multi-stage cleaning process is highly recommended to ensure optimal adhesion.
Start by gently brushing out any loose debris from the chip itself using a small, stiff brush or compressed air. Be careful not to dislodge more granite than necessary.
For deeper chips, a fine pick or dental tool can be used to carefully dislodge embedded particles without scratching the surrounding intact granite. Ensure all fractured pieces are removed from the cavity.
Next, use a degreasing agent like isopropyl alcohol or acetone on a clean, lint-free cloth. Meticulously wipe down the chipped area and surrounding granite, repeating until no residue is visible.
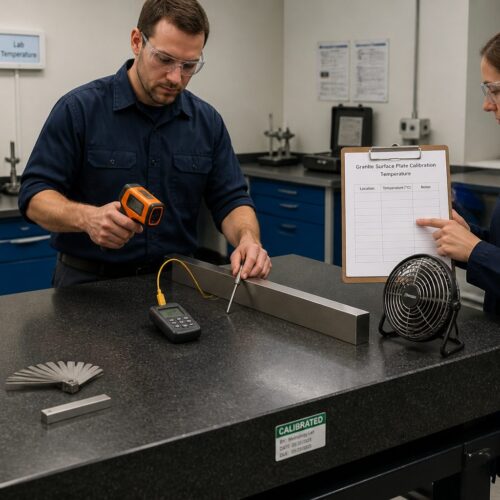
These solvents effectively remove oils, greases, and other organic contaminants that are commonly found in workshop environments. Always use them in a well-ventilated area and away from open flames.
Allow the cleaning agent to fully evaporate before proceeding to the next step. Any lingering moisture can interfere with the epoxy’s curing process and bond strength.
A final wipe with a dry, lint-free cloth or a blast of clean, dry compressed air can ensure the area is perfectly dry and free of any residual fibers. This meticulous preparation sets the foundation for a long-lasting and effective repair.
Blending the Repair for Minimal Impact on Flatness
After the granite filler metrology epoxy has fully cured, blend the repair seamlessly with the surrounding granite. Remove excess material without creating new high or low spots that could affect accuracy.
The goal is not just to fill the void, but to integrate the repair so smoothly that it becomes virtually undetectable to both sight and touch. This requires a delicate touch and progressive refinement.
Start with medium-grit wet/dry sandpaper, like 220 or 320-grit, wrapped around a small, flat sanding block. The block helps distribute pressure evenly, preventing inadvertent depressions.
Using water during sanding helps to lubricate the surface, reduce friction, and carry away granite dust, resulting in a smoother finish and preventing heat buildup. Ensure the water is clean to avoid introducing new contaminants.
Work slowly, frequently checking your progress by running your fingertip over the repaired area. You want to feel a smooth transition from the filler to the original granite.
Periodically wipe away the sanding slurry with a clean, damp cloth to better inspect the surface. This allows you to identify any remaining high spots or unevenness early in the process.
Once the bulk of excess is removed, switch to finer grits, like 400 or 600-grit, to refine the surface. This progressive sanding minimizes repair visibility and ensures a subtle transition.
For a truly polished look, you might even progress to 800 or 1000-grit sandpaper, depending on the desired finish and the original texture of your surface plate. The finer the grit, the less noticeable the repair will be.
For surface plate edge damage, match the original chamfer or edge profile as closely as possible. A smooth, flush finish is essential to prevent instruments from snagging.
Use the sanding block to carefully recreate the angle of the chamfer, ensuring it aligns perfectly with the undamaged portions of the edge. This attention to detail preserves the plate’s intended geometry and functionality.
Post-Repair Inspection and Verification Steps
Once your DIY minor granite surface plate chip repair is complete and blended, a thorough inspection is essential. This step ensures the repair is sound, smooth, and has not introduced new issues.
A meticulous post-repair check confirms that your efforts have been successful and that the surface plate remains suitable for precision work. This verification provides confidence in your equipment’s reliability.
Start by visually examining the repaired area under good lighting, perhaps with a magnifying glass. Look for any remaining high spots, pits, or inconsistencies in the filler.
Angle the light source across the surface to highlight any shadows or reflections that indicate unevenness. This technique can reveal subtle imperfections that might otherwise go unnoticed.
Next, run your fingertip gently over the repaired section. You should not feel any discernible bump or depression where the filler meets the granite.
The tactile test is surprisingly effective for detecting minute changes in elevation that could affect the stability of measuring instruments. A truly seamless repair will feel uniform to the touch.
For chips on the main working surface, use a precision straight edge or feeler gauge to check localized flatness. Place the straight edge across the repair and observe if light passes underneath.
If light is visible, it indicates a high spot, meaning further sanding is required. Conversely, if the straight edge dips into the repair, it’s a low spot, which is harder to correct and might indicate over-sanding.
Finally, clean the entire surface plate thoroughly to remove any sanding dust or residue. A clean plate is a functional plate, ready for accurate measurements.
Perform a final wipe with a specialized granite cleaner to restore the plate’s natural luster and ensure no abrasive particles remain. This completes the repair process, leaving your surface plate ready for duty.
Common Mistakes to Avoid During DIY Chip Repair
Attempting a DIY minor granite surface plate chip repair can be rewarding, but common mistakes compromise the outcome. Being aware of these pitfalls helps you avoid them, ensuring a more successful and lasting repair.
Many errors stem from impatience or a lack of understanding regarding the properties of granite and epoxy. Rushing any step can lead to an inferior repair that may fail prematurely.
One major mistake is inadequate cleaning of the chipped area before applying filler. Any lingering dust, oil, or debris will prevent the epoxy from bonding correctly, leading to a weak or failed repair.
Failing to allow cleaning solvents to fully evaporate before applying epoxy is another common oversight. Residual moisture can interfere with the curing process, resulting in a soft or brittle filler.
Another common error is using the wrong type of filler material. Generic epoxies or fillers not designed for granite may shrink, crack, or lack the necessary hardness for a metrology environment.
Always choose a high-quality, two-part epoxy specifically formulated for stone or granite repair, preferably one with “metrology” or “precision” in its description if available. These products are engineered for stability and durability.
Overfilling the chip or applying too much epoxy is another frequent problem that makes blending difficult. This creates excess material that is hard to sand flush without affecting the surrounding granite’s flatness.
It’s always better to apply multiple thin layers if needed, rather than one thick application, allowing each layer to cure. This provides more control and reduces the amount of material to be removed during sanding.
Rushing the sanding and blending process can also lead to issues, such as creating new low spots or unevenness. Patience and light, even pressure are crucial for a seamless finish on your surface plate edge damage repair.
Using an inappropriate sanding block or applying uneven pressure can quickly compromise the flatness of the repaired area, making the surface plate less reliable for precise measurements. Always use a flat, rigid block.
Finally, neglecting to wear appropriate personal protective equipment, such as gloves and safety glasses, is a serious mistake. Epoxies can be skin irritants, and sanding generates fine dust that should not be inhaled or get into eyes.
By being mindful of these common pitfalls, you significantly increase the likelihood of a successful and enduring DIY repair, preserving the accuracy and value of your granite surface plate.
When to Seek Professional Reconditioning Services
While DIY minor granite surface plate chip repair can address small imperfections, many types of damage absolutely require professional reconditioning. Knowing when to call in experts saves you from potentially ruining a valuable piece of equipment.
Professionals possess the specialized tools, expertise, and calibration equipment necessary to restore a surface plate to its original certified specifications. Their services extend far beyond simple chip filling.
Serious damage includes deep gouges, large chips that affect the main working surface, or any visible cracks extending into the plate. These issues compromise the underlying structural integrity and overall flatness beyond simple cosmetic repair.
A crack, even if small, can propagate over time due to temperature changes or vibrations, leading to catastrophic failure of the plate. Such damage requires expert assessment and often specialized repair techniques like pinning or complete replacement.
Any significant loss of material that impacts the plate’s certified flatness specification demands professional re-lapping. This process involves precise grinding and polishing to restore the plate to its original accuracy.
Re-lapping is a highly skilled procedure that removes a thin layer of granite from the entire working surface, ensuring uniform flatness across the entire plate. This cannot be replicated with DIY methods.
If your surface plate has developed a general wear pattern, an overall loss of flatness, or extensive abrasion, professional reconditioning is the only solution. Regular use inevitably causes some wear, and re-lapping restores the entire working area.
Over time, even without visible chips, the constant friction from instruments can cause localized wear spots, leading to a gradual degradation of overall flatness. Professional reconditioning addresses this systemic wear.
Investing in professional reconditioning extends the life of your surface plate and maintains its precision for critical measurements. Do not hesitate to consult with experts for anything beyond a simple small granite chip repair on the edges.
Many metrology labs offer routine calibration and reconditioning services, which are crucial for maintaining compliance with quality standards and ensuring the long-term accuracy of your measurement system. Consider scheduling these services periodically.
Conclusion
Maintaining the accuracy and integrity of your granite surface plate is paramount for precision metrology. Understanding when and how to perform a DIY minor granite surface plate chip repair allows you to address small issues promptly.
Proactive care not only preserves the plate’s functionality but also safeguards the quality of all measurements performed upon it. A well-maintained surface plate is a testament to a commitment to precision.
We have explored the impact of chips on accuracy, how to distinguish minor damage from major, and the appropriate times for DIY fixes. Gathering the correct granite filler metrology grade materials and tools is essential for a successful repair.
Remember that meticulous preparation, including thorough cleaning and proper epoxy application, forms the bedrock of any lasting repair. Skipping these foundational steps can lead to frustrating and ineffective outcomes.
Blending the repair seamlessly and conducting thorough post-repair inspections ensure your plate remains a reliable reference plane. These verification steps are crucial for confirming the success of your efforts.
Always use a flat sanding block and progressive grits to achieve a smooth, flush finish, especially when dealing with critical edges or surfaces. Patience during sanding is a virtue that pays off in precision.
Remember to avoid common mistakes, such as inadequate cleaning or rushing the sanding process. These pitfalls can undermine even the most well-intentioned repair attempts.
For more significant damage, such as deep gouges, cracks, or an overall loss of flatness, professional reconditioning services are indispensable. Their specialized expertise ensures your plate is restored to its original certified accuracy.
Recognizing the limits of DIY repair and knowing when to engage professional services is a mark of a responsible metrologist. This judgment protects your investment and maintains the highest standards of measurement.
Ultimately, your commitment to proper maintenance, including informed decisions about surface plate edge damage and small granite chip repair, safeguards your measurement quality. A well-maintained surface plate is a cornerstone of consistent precision in any demanding environment.
By integrating these practices into your regular equipment care routine, you ensure your granite surface plate continues to serve as an accurate and reliable foundation for all your precision measurement needs for years to come.