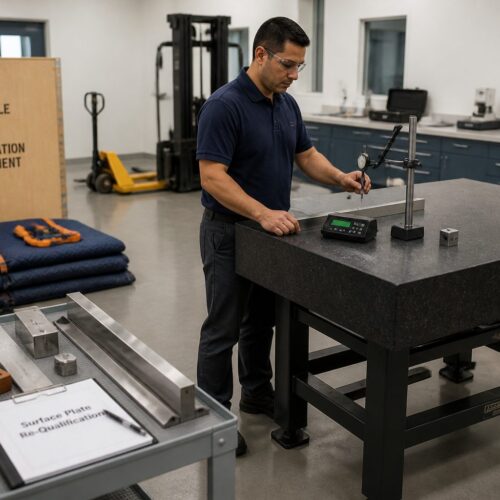
Setting up a granite surface plate correctly involves more than just placing it on any convenient surface. Precise metrology relies on a stable, level foundation, which is exactly what a well-chosen stand and proper leveling technique provide. Ignoring these steps can introduce subtle errors into your measurements, compromising the integrity of your quality control.
Many assume that because a surface plate is inherently flat, its orientation does not matter. This perspective overlooks the critical role of gravity and structural stability in high-precision work. A slight tilt or uneven support can lead to deflection and inconsistent readings across the plate’s surface.
Proper surface plate stand leveling ensures that the plate itself is not under any undue stress, allowing it to maintain its certified flatness. It establishes a consistent reference plane, which is absolutely essential for accurate measurements with instruments like height gauges, dial indicators, and coordinate measuring machines.
Why Leveling Matters Even If Flatness Is a Separate Spec
It’s easy to assume that a certified flat surface plate will perform perfectly regardless of its support. However, this assumption misses a fundamental point about how gravity affects large, heavy objects. Even the most perfectly lapped granite can subtly distort if not properly supported.
Think about a book resting on an uneven surface; the pages might not lie perfectly flat, even if the book itself is made of rigid material. Similarly, a surface plate can experience minute deflections if its weight is not distributed evenly across its supporting points.
These deflections are often imperceptible to the naked eye, but they are significant in the world of precision metrology. A deviation of just a few microns can mean the difference between an in-spec and out-of-spec part. This is why proper surface plate stand leveling is so important.
The primary purpose of leveling is to ensure the granite plate rests in a stress-free state. When stress is introduced, such as from an uneven stand or twisted support, the plate can flex, altering its true flatness. This flexing directly impacts measurement accuracy.
Furthermore, an unlevel plate can cause measurement tools to drift or bind, leading to inaccurate readings. Instruments designed to move smoothly across a truly flat and level surface will not perform optimally if the underlying foundation is compromised. This introduces variability that operators might not even attribute to the stand itself.
Gravity constantly pulls on the surface plate, and an improperly leveled stand can exacerbate these forces unevenly. This can lead to localized high-pressure points or areas of unsupported mass, which can eventually warp the granite over time. Protecting your investment requires careful setup.
Ultimately, while flatness is a property of the plate itself, leveling creates the optimal environment for that flatness to be realized in practice. It removes external influences that could otherwise degrade the plate’s performance, ensuring every measurement starts from a true and stable baseline.
Understanding Three-Point Support and Why It’s Used
The concept of three-point support is fundamental to stable setups in metrology, and it is universally applied to surface plates. This principle states that any rigid body, like a granite surface plate, will always find a stable resting position on exactly three points. This geometric truth eliminates rocking and instability.
Imagine trying to balance a table with four legs on an uneven floor; it almost always wobbles. Remove one leg, and the three remaining legs will contact the floor, providing a stable, albeit tilted, base. This stability is why surface plate stands are designed with three adjustable leveling screws.
Using more than three support points, such as four legs, introduces a problem called “over-constraint.” With four points, it becomes incredibly difficult to ensure all points bear an equal load, leading to some points carrying more stress than others. This uneven loading can cause the surface plate to twist or flex, defeating the purpose of its flatness.
The three-point design ensures that the entire weight of the surface plate is distributed predictably and evenly across the stand’s contact points. Each of the leveling screws then allows precise adjustment to achieve a truly level plane without introducing internal stresses into the granite. This simplicity is its strength.
Manufacturers design surface plates with specific support points, often marked on the underside of the plate. These points are typically chosen to minimize deflection and maintain the plate’s inherent flatness under its own weight. Always align the stand’s leveling screws with these designated support areas.
If you use a stand with more than three points, you must ensure that only three points actively bear the load and are adjustable. Any additional points should be retracted or used only for safety, not for primary support. Ignoring this principle can easily compromise your measurements.
The elegance of three-point support lies in its guaranteed stability and its ability to prevent over-constraint. It allows for precise surface plate stand leveling without introducing unwanted stresses into the granite itself. This foundation is crucial for any high-accuracy metrology application.
Choosing the Right Stand for Your Plate Size and Load
Selecting the correct stand for your surface plate is just as important as the plate itself. An undersized or flimsy stand can compromise stability, regardless of how meticulously you perform surface plate stand leveling. You need a stand designed to handle both the weight and dimensions of your specific granite plate.
Consider the total weight of your surface plate, including any fixtures or heavy parts that might regularly sit on it. The stand’s load capacity must significantly exceed this total weight to ensure structural integrity and prevent sagging. Manufacturers usually provide clear load ratings for their stands.
| Plate Size (L x W) | Minimum Load Capacity | Recommended Stand Type |
|---|---|---|
| 18″ x 24″ | 500 lbs | Light-duty, welded steel |
| 24″ x 36″ | 800 lbs | Medium-duty, adjustable height |
| 36″ x 48″ | 1500 lbs | Heavy-duty, robust frame |
| 48″ x 72″ | 3000 lbs | Extra heavy-duty, reinforced frame |
| 72″ x 120″ | 6000+ lbs | Custom fabricated, multi-leg |
Floor Conditions: Concrete, Isolation Pads, and Anchoring
The floor beneath your surface plate stand plays a significant, often overlooked, role in overall stability and measurement accuracy. A perfectly leveled plate on a shaky floor will still yield inconsistent results. You must consider the structural integrity and vibration dampening capabilities of your workspace.
Concrete floors generally offer the best foundation for surface plates due to their mass and rigidity. A thick, reinforced concrete slab provides a stable base that resists deflection and transmits less vibration than lighter floor constructions. Placing your plate directly on a concrete slab is often the ideal scenario.
However, even concrete can transmit vibrations from nearby machinery or foot traffic. This is where vibration control solutions become essential. Isolation pads, made from materials like neoprene, cork, or specialized composite elastomers, can be placed under the stand’s feet to absorb these disruptive frequencies.
Choosing the right isolation pad depends on the frequency and amplitude of the vibrations present in your environment. Some pads are designed for high-frequency, low-amplitude vibrations, while others excel at dampening lower-frequency, higher-amplitude shocks. Consulting with a vibration control specialist can be helpful for complex situations.
In some cases, especially with very large or permanently installed surface plates, anchoring the stand to the floor might be necessary. Anchoring provides an extra layer of stability, preventing accidental movement or shifting that could throw off your surface plate stand leveling. This is particularly relevant in high-traffic areas or facilities with heavy machinery.
Before anchoring, always ensure you know what lies beneath the floor surface, such as electrical conduits or plumbing. Drilling blindly can cause serious damage and safety hazards. Proper planning and professional installation are crucial for anchored setups.
Regardless of your floor type, inspect it for cracks, unevenness, or soft spots before positioning your stand. Address any significant imperfections to create the most stable base possible. A solid foundation is the first step toward reliable metrology.
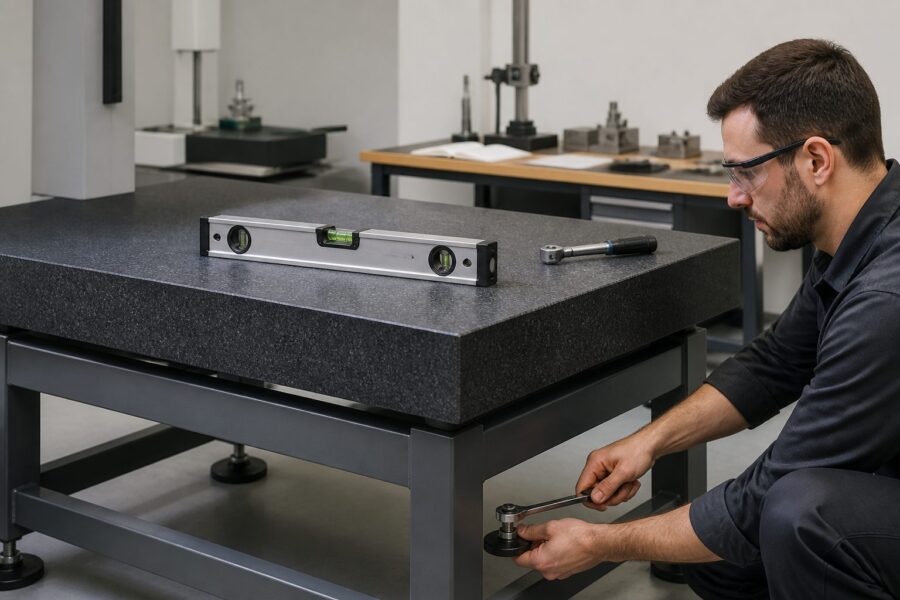
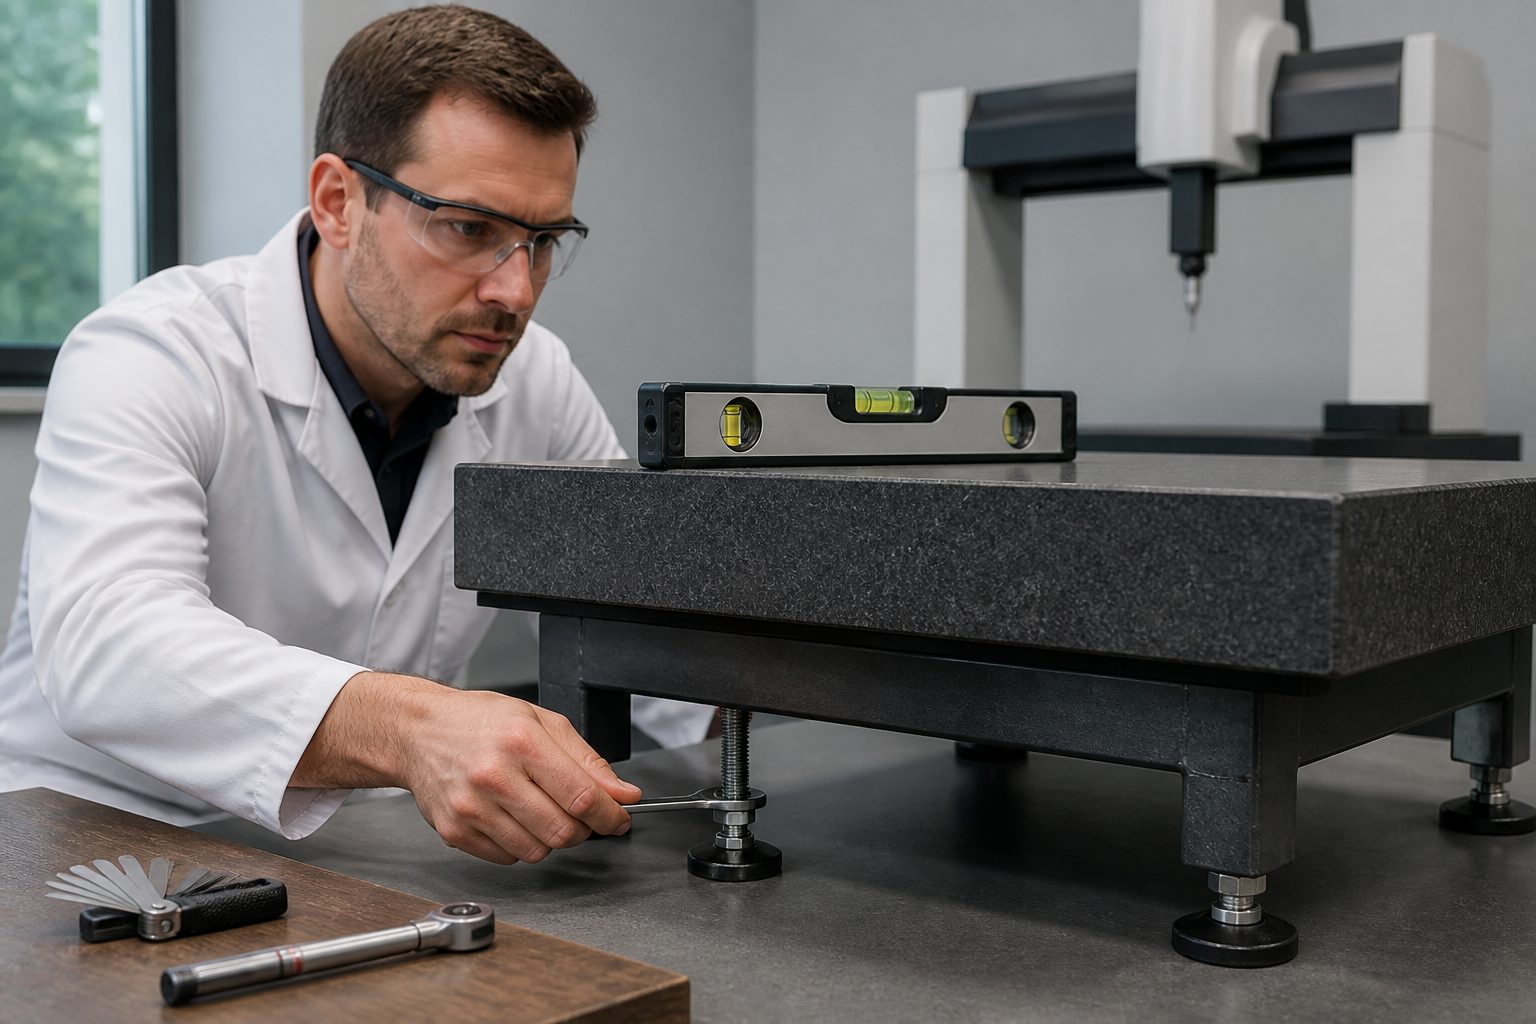
Step-by-Step Leveling Procedure You Can Follow
Performing surface plate stand leveling correctly is a methodical process that requires patience and precision. Rushing this step almost guarantees inaccurate measurements later on. Following a clear procedure ensures you achieve optimal stability and a truly level reference plane.
Always start with a clean surface plate and a stable, appropriate stand. Gather your precision level, such as a machinist’s level or an electronic level, and any necessary wrenches for the leveling screws. Take your time with each adjustment.
- Place the surface plate on its stand
- Position the precision level near one edge
- Adjust the nearest leveling screw to bring the bubble roughly to center
- Move the level to the opposite edge, rotating it 180 degrees
- Adjust the second leveling screw to center the bubble again
- Place the level diagonally across the plate
- Use the third leveling screw for fine-tuning
- Recheck all four positions (edges and diagonals)
- Repeat adjustments until the level reads consistently
- Tighten all locking nuts on the leveling screws
- Allow the plate to settle for a few hours
How to Verify Stability After Leveling
Achieving a level reading is only half the battle; ensuring that level holds under normal operating conditions is the real test. Verifying stability after surface plate stand leveling helps confirm that your setup will deliver consistent and reliable measurements over time. This step prevents frustrating drift.
After completing the initial leveling, allow the surface plate to “settle” for at least a few hours, or even overnight, if possible. Granite is thermally stable, but the stand and floor can still experience minor shifts. Recheck your level readings after this settling period to see if any adjustments are needed.
A simple yet effective test is to apply light pressure to different areas of the surface plate and observe the level. Gently push down on each corner and along the edges, watching for any movement in the level’s bubble. If the bubble shifts significantly, it indicates instability in the stand or floor.
Another method involves placing a heavy object, similar to what you might measure, on the plate and rechecking the level. The plate should remain level even under the additional load. If it tilts, the stand might be insufficient or the leveling screws are not adequately secured.
Consider the environment: foot traffic, nearby machinery, or changes in temperature can all affect stability. Observe the level during periods of typical activity in your workspace. This helps identify if ambient conditions are introducing subtle movements that impact your precision.
For critical applications, you might use a sensitive electronic level with data logging capabilities. This allows you to monitor the plate’s level over extended periods, detecting any minute deviations that occur throughout the day or night. This provides an objective measure of stability.
Finally, perform a calibration check with known masters after leveling and stability verification. Use calibrated gauge blocks or other reference standards to confirm that your measurements are accurate across the plate. This is the ultimate proof that your surface plate stand leveling provides a reliable foundation.
Common Setup Mistakes That Create Measurement Drift
Even experienced technicians can sometimes fall victim to common pitfalls during surface plate setup, leading to frustrating measurement drift. Recognizing these mistakes is the first step toward avoiding them and ensuring the consistent accuracy of your metrology operations. Small oversights can have large consequences.
One frequent error is failing to use the designated support points on the underside of the granite plate. Manufacturers engineer these points to minimize deflection, and placing leveling screws elsewhere can induce stress. Always consult your plate’s documentation or markings for proper placement.
Another common mistake involves over-tightening or under-tightening the leveling screws. Over-tightening can introduce localized stress into the granite, causing subtle warps. Under-tightening, conversely, leaves the plate unstable and prone to rocking, negating all your careful surface plate stand leveling efforts.
Not securing the locking nuts on the leveling screws is a surprisingly prevalent oversight. Even if the plate is perfectly level, loose locking nuts allow the screws to vibrate or slowly unwind over time. This gradual shift inevitably leads to measurement drift and requires frequent re-leveling.
Ignoring floor conditions can also cause significant problems. Placing a heavy surface plate on an uneven, vibrating, or structurally weak floor means the plate will never achieve true stability. The floor acts as the ultimate foundation, and its condition directly impacts the plate’s performance.
Using an inappropriate stand, either too small or too flimsy for the plate’s weight, is another critical error. An inadequate stand can sag or flex under load, introducing instability that no amount of leveling can truly fix. Always ensure your stand is rated for your specific plate.
Finally, neglecting to allow the plate to settle after initial leveling often results in immediate drift. Granite and its support system need time to normalize after adjustments. Rechecking the level after a settling period is a simple but important step to prevent future issues.
Avoiding these common setup mistakes requires attention to detail and a methodical approach. A robust and stable setup is the bedrock of accurate metrology. Proper surface plate stand leveling and verification save time and ensure reliable results in the long run.
Managing Vibration From Nearby Machines
Vibration is a silent enemy of precision metrology, capable of introducing significant errors even on a perfectly leveled surface plate. Industrial environments are often filled with sources of vibration, from CNC machines and presses to HVAC systems and forklifts. Effectively managing these disturbances is absolutely essential for accurate work.
The first step in vibration control is identifying the sources and understanding their characteristics. Use a vibrometer or even a simple glass of water on the plate to observe how and when vibrations occur. Knowing the frequency and amplitude of the vibrations helps in selecting appropriate dampening solutions.
Isolation pads are a primary tool for vibration control, as discussed earlier. These pads decouple the surface plate stand from the floor, absorbing kinetic energy before it can reach the granite. They come in various materials and designs, each suited for different vibration profiles.
For more severe vibration issues, active vibration isolation systems might be necessary. These sophisticated systems use sensors and actuators to actively counteract incoming vibrations, maintaining a near-perfectly still environment for the surface plate. While more expensive, they offer unparalleled performance in challenging conditions.
Strategic placement of your surface plate can also significantly reduce vibration exposure. Locate the plate as far away as possible from heavy machinery, high-traffic aisles, or building structural elements that transmit vibrations. Sometimes, simply moving the plate a few feet makes a noticeable difference.
Consider the structure of the building itself. A ground-floor concrete slab is generally more stable than an upper floor with a suspended structure. If possible, situate your metrology lab in the most structurally sound part of your facility to minimize ambient vibration.
Regular maintenance of nearby machinery can also help reduce vibration output. Worn bearings, unbalanced components, or loose foundations on other equipment can generate excessive vibrations that travel through the floor. Addressing these issues benefits both machine performance and metrology accuracy.
Re-Leveling: When to Check Again and Why
Surface plate stand leveling is not a one-time event; it is an ongoing maintenance task essential for sustained accuracy. Even the most robust setup can shift over time due to various environmental and operational factors. Regular re-leveling checks are crucial for maintaining measurement integrity.
A good rule of thumb is to recheck your surface plate’s level at least once every six months, or more frequently for critical applications. This routine inspection helps catch minor shifts before they accumulate into significant measurement errors. Consistency in checking is key.
Anytime the surface plate is moved, even slightly, a full re-leveling procedure is mandatory. Shifting its position, even by a few inches, can alter the contact points with the floor and introduce new stresses. Never assume a plate remains level after relocation.
Significant changes in the surrounding environment also warrant a re-leveling check. This includes major construction work in the building, installation of new heavy machinery nearby, or substantial changes in temperature and humidity. These factors can induce floor or stand movement.
If you notice inconsistent measurements or unexpected drift during your daily operations, re-leveling should be one of the first troubleshooting steps. It is a common cause of accuracy issues that often gets overlooked in favor of blaming the measuring instruments themselves. Always start with the foundation.
Regular calibration of your surface plate, typically performed annually by a certified technician, also includes a level check. However, you should not wait for the annual calibration to address obvious leveling issues. Proactive checks keep your plate performing optimally between professional services.
The leveling screws and their locking nuts can gradually loosen due to subtle vibrations or normal wear and tear. Periodically inspecting and re-securing these components during your re-leveling checks helps prevent future shifts. This small action makes a big difference in long-term stability.
Simple Setup Documentation for Consistent Results
Establishing a robust surface plate setup is important, but documenting that setup is equally vital for consistent results and troubleshooting. A simple, clear record of your leveling procedure and environmental conditions ensures that anyone can replicate the optimal configuration. This prevents guesswork and promotes standardization.
Start by recording the date of the initial surface plate stand leveling and the names of the technicians who performed the work. This creates an audit trail and accountability for the setup. Knowing who did what can be invaluable if issues arise later.
Document the specific type of stand used, including its model number and load capacity. Note the precise location of the leveling screws relative to the plate’s designated support points. A simple sketch or photograph can be very helpful here for visual reference.
Record the initial level readings at each of the cardinal and diagonal points after leveling. These baseline measurements provide a reference for future re-leveling checks. Any significant deviation from these numbers will immediately indicate a shift in the plate’s position.
Include details about the floor conditions, such as the type of flooring and whether isolation pads or anchoring were used. If isolation pads are in place, specify their type and placement. This information is crucial for maintaining the vibration control strategy.
Note any environmental factors that might affect stability, such as proximity to heavy machinery or high-traffic areas. This context helps explain potential vibration sources or why more frequent re-leveling might be necessary. Awareness of the environment is key.
Finally, establish a clear schedule for routine re-leveling checks and document each instance. Record the date, the readings, and any adjustments made. This ongoing log demonstrates due diligence and helps identify long-term trends in plate stability.
Conclusion
Proper surface plate stand leveling is a foundational element of accurate metrology, far more important than many initially realize. It ensures the granite plate remains stress-free, allowing its inherent flatness to provide a true reference plane for all measurements. Ignoring this step compromises the integrity of your work.
The principle of three-point support, combined with a robust stand matched to your plate’s size and weight, forms the bedrock of a stable setup. These design choices are not arbitrary; they are engineered to provide maximum stability with minimal internal stress on the granite. This allows for precise and reliable results.
Beyond the plate and stand, environmental factors like floor conditions and ambient vibrations require careful consideration. Utilizing isolation pads or even anchoring can mitigate these external influences, creating a quiet and stable zone for your precision work. Proactive vibration control is always a smart investment.
Implementing a clear, step-by-step leveling procedure and verifying stability afterward prevents common setup mistakes that lead to measurement drift. Regular re-leveling checks and thorough documentation ensure that your surface plate continues to perform optimally over its lifetime. Consistency is paramount in precision measurement.
Investing time and attention into proper surface plate stand leveling pays dividends in consistent, trustworthy measurement results. It protects your investment in quality granite and ensures every reading you take contributes to reliable quality control. This attention to detail defines true metrology excellence.