Maintaining the pristine condition of your granite surface plate is fundamental for accurate metrology and calibration work. Even the slightest blemish can compromise precision measurements, making consistent cleanliness a top priority for any quality-focused operation. However, in busy workshop environments, stains from ink, layout dye, oils, and other residues are an unfortunate reality that demands careful attention.
Dealing with these marks requires more than just a quick wipe; it calls for a strategic approach that respects the integrity of the granite. Improper cleaning methods can actually worsen a stain or, even worse, damage the meticulously lapped surface of your precision instrument. This guide provides practical, safe, and effective methods for surface plate stain removal, ensuring your granite calibration standards remain accurate and reliable.
We will walk you through identifying different stain types, selecting the right approved cleaning agents, and applying techniques that protect your investment. Understanding the nature of granite porosity and how various substances interact with it is key to successful layout dye cleanup and general residue removal. Our aim is to equip you with the knowledge to tackle common shop stains confidently.
Why stains happen on granite and what makes them stubborn
Granite, while appearing solid and impenetrable, is a naturally porous material. It consists of various minerals like quartz, feldspar, and mica, which are bound together but leave microscopic capillaries throughout the stone. These tiny channels are the primary reason liquids can penetrate the surface, leading to stubborn stains over time.
When substances like oils, dyes, or inks come into contact with the granite, they get absorbed into these pores. The longer a liquid sits on the surface, the deeper it can wick into the material, making it much harder to extract later. This deep penetration is why simple surface wiping often fails to remove old or persistent marks.
The chemical composition of the staining agent also plays a significant role in its tenacity. Some dyes, for example, contain pigments that bond chemically with the minerals in the granite, creating a more permanent discoloration. Understanding this interaction helps explain why a universal cleaning solution rarely works for every type of stain.
Furthermore, the polished or lapped finish of a surface plate, while incredibly smooth, still possesses this inherent granite porosity. Aggressive scrubbing or using harsh, inappropriate chemicals can damage this critical surface, compromising its flatness and accuracy. You must approach surface plate stain removal with both care and specific knowledge to avoid unintended harm.
The stubbornness of these stains often comes down to their depth within the stone and their chemical compatibility with granite. Effective cleaning requires drawing the staining agent out of the pores rather than just wiping it off the top. This process demands patience and the right approved cleaning agents designed for precision granite.
Common stain sources in inspection and layout work
Inspection and layout operations introduce various materials that can easily stain a granite surface plate. Layout dye, often bright blue or red, is a frequent culprit, used to mark workpieces before machining or cutting. If not cleaned immediately, this dye can quickly penetrate the granite porosity and leave a lasting mark.
Beyond dyes, common shop oils, hydraulic fluids, and even lubricants from measuring instruments can leave greasy smudges or dark spots. These oil-based stains are particularly insidious because they spread easily and can attract dirt, further embedding themselves into the stone. Understanding these common sources helps you anticipate and prevent potential damage to your valuable equipment.
| Stain Type | Common Source | Appearance on Granite | Typical Challenge |
|---|---|---|---|
| Layout Dye | Marking out tools, scribe lines | Bright blue, red, or black lines/smudges | Deep penetration, difficult to lift without spreading |
| Oil/Grease | Machine parts, lubricants, fingerprints | Dark spots, hazy film, greasy residue | Can spread easily, attracts dust, hard to degrease completely |
| Ink | Pens, markers, stamps | Black, blue, or red marks | Pigment can bond with stone, quick absorption |
| Adhesive Residue | Tape, labels, temporary fixtures | Sticky patches, dull film, dirt accumulation | Requires specific solvents, can leave a ghost mark |
| Rust | Metal parts left on surface, water | Brownish-orange spots, often with pitting | Can be difficult to remove without etching |
First steps: identify the stain and stop spreading it
The moment you notice a stain on your surface plate, immediate action is your best defense against permanent damage. Prompt identification of the stain type guides your cleaning strategy and helps prevent further contamination. Take a moment to observe the stain’s color, texture, and any associated odor, as these clues are vital for effective surface plate stain removal.
Your next critical step involves containing the stain to prevent it from spreading further across the precision surface. If it is a liquid, gently blot the excess with a clean, absorbent paper towel, ensuring you do not rub or wipe aggressively. Rubbing pushes the staining agent deeper into the granite porosity and can enlarge the affected area.
For solid or semi-solid residues like adhesive blobs or thick grease, use a plastic scraper to carefully lift as much material as possible. Always use a non-abrasive tool to avoid scratching the delicate granite surface. The goal here is to remove bulk material without pushing it into the stone’s pores.
Once you have removed any excess material, isolate the stained area. You can place a clean, dry cloth around the perimeter of the stain to create a barrier, especially if you plan to use a liquid cleaner. This simple step minimizes the risk of the cleaning agent or the dissolved stain spreading to unaffected areas of the surface plate.
Before applying any cleaning agent, ensure the surrounding area is clean and dry. This preparation prevents accidental smearing or the introduction of new contaminants during the cleaning process. A clean starting point makes the entire surface plate stain removal effort more efficient and successful.
Safe cleaning approach: least aggressive to more targeted
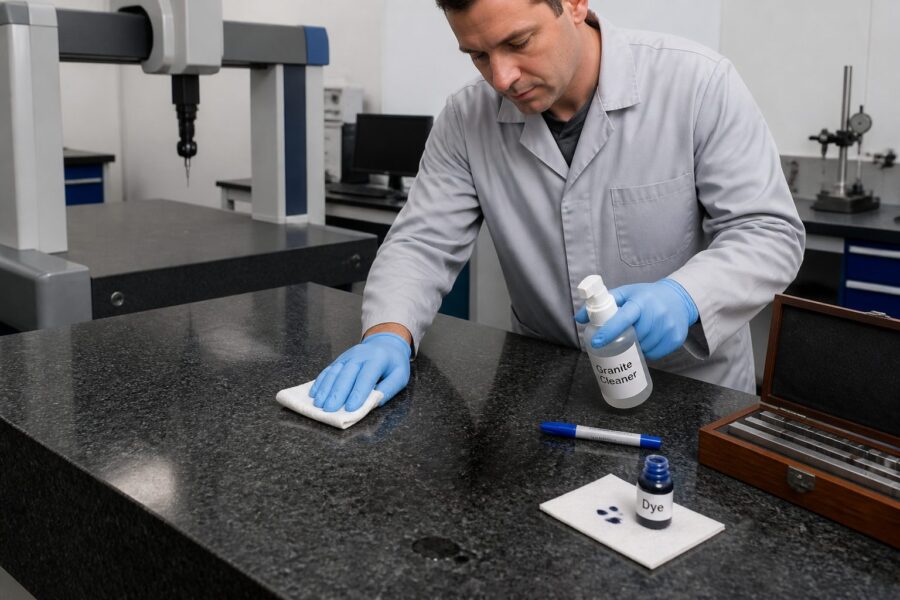
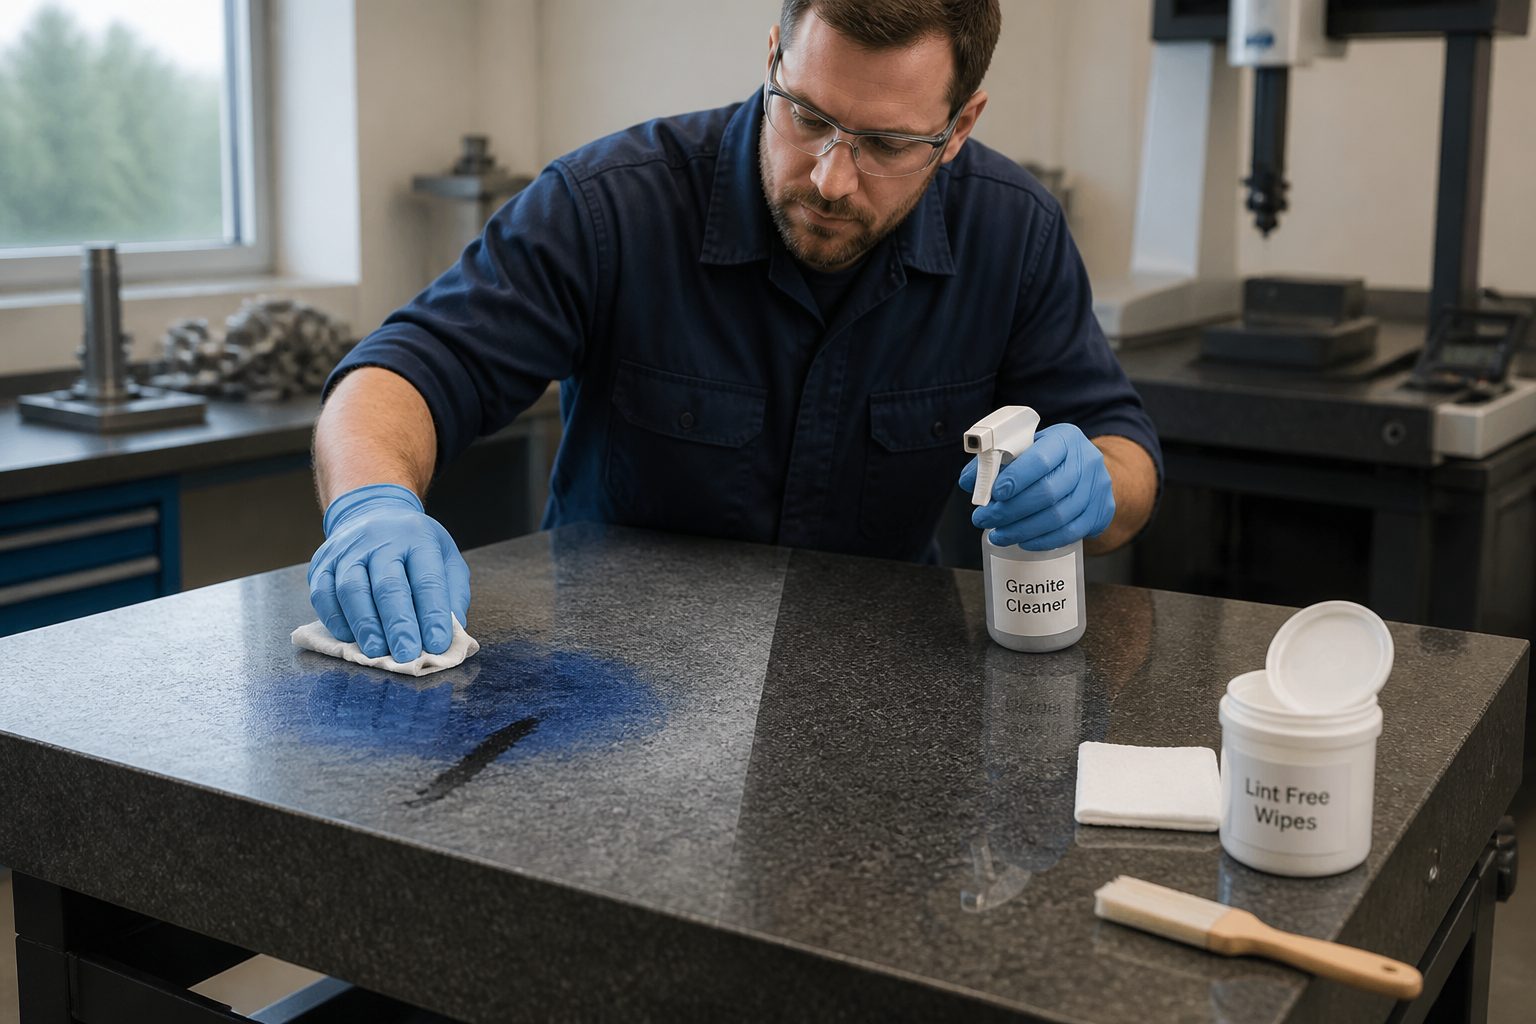
Always begin your surface plate stain removal efforts with the least aggressive method possible to protect the granite’s precision surface. Your initial approach should involve clean, distilled water and a mild, pH-neutral detergent, similar to dish soap. Mix a small amount of soap with water, dampen a clean, lint-free cloth, and gently wipe the stained area.
If the mild soap and water prove insufficient, escalate your efforts to approved cleaning agents specifically formulated for granite. Many manufacturers offer specialized granite cleaners that are non-abrasive and safe for precision surfaces. These products often contain agents that help lift stains from granite porosity without damaging the stone.
For more stubborn, deeply embedded stains, a poultice method often yields the best results. A poultice is a paste made from an absorbent material, such as kaolin clay or baking soda, mixed with a chemical cleaning agent specific to the stain type. This paste draws the stain out of the granite as it dries, offering a targeted solution for tough marks.
Before applying any new cleaning agent or poultice to a visible stain, always test it in an inconspicuous area of the surface plate first. This precaution helps you confirm that the cleaner does not etch, discolor, or otherwise harm the granite. A small test area can save you from accidentally causing more widespread damage.
Regardless of the method used, thorough rinsing is essential after any cleaning application. Use clean, distilled water and a fresh, lint-free cloth to wipe away all cleaning residues completely. Any leftover cleaner can leave a film or attract dust, compromising the accuracy of your surface plate.
Removing layout dye without leaving a film
Layout dye cleanup presents a specific challenge because these dyes are designed to stick firmly to metal, and they can penetrate granite porosity quickly. The key is to dissolve the dye without smearing it or leaving a residue that affects measurements. Always ensure you work in a well-ventilated area when using solvents for layout dye cleanup.
Approved cleaning agents for layout dye often include solvents like denatured alcohol or acetone, but always check your surface plate manufacturer’s recommendations first. Apply these solvents sparingly to a clean, lint-free cloth, and gently dab the stained area rather than rubbing. This method helps lift the dye out of the granite without pushing it deeper.
- Gather necessary materials: solvent, clean cloths, protective gloves.
- Ensure adequate ventilation in your workspace.
- Dampen a small area of a clean, lint-free cloth with the solvent.
- Gently blot the layout dye stain, working from the outside in.
- Avoid aggressive rubbing to prevent spreading the dye.
- Use fresh sections of the cloth as the dye transfers.
- Repeat blotting with a fresh cloth until the dye is gone.
- Wipe the area clean with distilled water to remove any solvent residue.
- Dry the surface immediately with a separate, clean, dry cloth.
Handling adhesive residue, tape marks, and label glue
Adhesive residue, from masking tape used for temporary fixturing or old labels, can leave sticky, unsightly marks on your surface plate. These residues not only detract from the plate’s appearance but also attract dust and debris, potentially compromising measurement accuracy. Tackling these requires a gentle yet effective approach for surface plate stain removal.
Start by attempting mechanical removal using a plastic scraper or a credit card edge. Carefully push the scraper under the adhesive, lifting as much of the bulk material as possible without scratching the granite. This step reduces the amount of chemical solvent needed and minimizes the risk of spreading the sticky substance.
For the remaining sticky film, consider using approved cleaning agents like mineral spirits, rubbing alcohol, or a commercial adhesive remover like Goo Gone. Always check the product label to ensure it is safe for granite surfaces before application. Apply a small amount to a clean cloth, not directly to the granite, to control the spread.
Gently dab and wipe the adhesive residue, allowing the solvent to soften the glue. Work in small sections, using fresh parts of your cloth as the adhesive transfers away from the surface plate. Avoid harsh scrubbing motions which can force the adhesive deeper into the granite porosity or scratch the precision surface.
After successfully removing the adhesive, clean the area thoroughly with mild soap and distilled water. This step removes any lingering solvent or glue residue, preventing a hazy film from forming. Finish by drying the surface completely with a clean, lint-free cloth, ensuring no moisture remains to attract new contaminants.
Dealing with oil haze and fingerprint buildup
Oil haze and fingerprint buildup are common occurrences on surface plates, especially in active workshop environments where hands frequently touch the precision surface. These oily residues can subtly alter the surface properties, affecting the wringing of gauge blocks and the overall accuracy of measurements. Regular attention to these issues is part of good surface plate stain removal practice.
For light oil haze and fresh fingerprints, a simple solution of warm water and a small amount of pH-neutral detergent often works wonders. Dampen a clean, lint-free cloth with this mixture and gently wipe the affected areas. The detergent helps emulsify the oils, allowing them to be lifted from the granite surface.
If the oil haze is more persistent or has accumulated over time, consider using a specialized granite degreaser or a solvent like isopropyl alcohol. These approved cleaning agents are designed to break down greasy residues effectively without harming the stone. Always apply these products to a cloth first, rather than directly onto the surface plate, to control application and prevent over-saturation.
When cleaning, use a consistent, gentle wiping motion across the surface, turning the cloth frequently to expose a clean section. This practice prevents you from simply redistributing the oil and dirt across the plate. Ensure you cover the entire affected area to achieve an even clean and avoid patchy results.
After degreasing, it is absolutely essential to rinse the surface thoroughly with clean, distilled water. Any remaining detergent or solvent residue can leave a film that attracts new oils and dust, defeating the purpose of your cleaning efforts. Dry the surface immediately and completely with a fresh, soft, lint-free cloth to restore its pristine condition.
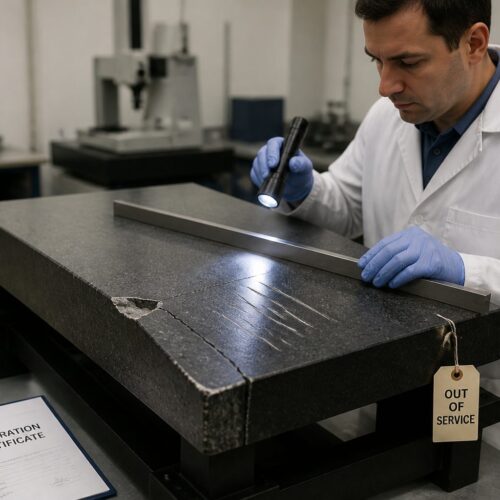
When a stain is actually surface wear or polish change
Sometimes, what appears to be a stubborn stain on your surface plate is actually a sign of physical wear or a change in the granite’s original finish. It is important to differentiate between a removable stain and actual surface damage to avoid unnecessary or counterproductive cleaning efforts. This distinction guides your next steps, whether it is continued cleaning or considering professional repair.
Look for signs such as dull spots, areas where the granite appears less reflective or has lost its original sheen. These can indicate etching, where acidic substances have chemically reacted with the granite, altering its surface texture. Unlike a stain, etching involves a physical change to the stone itself, making it impossible to “clean” away.
Scratches or small chips are also clear indicators of physical damage rather than a stain. Run your fingernail gently over the discolored area; if you feel an indentation or rough spot, it is likely surface wear. This kind of damage directly impacts the flatness and accuracy of the surface plate, demanding more serious attention than simple surface plate stain removal.
Another common issue is localized wear from repetitive contact with tools or workpieces in a specific area. This can create a slightly depressed or uneven spot that might look like a dark stain but is actually a material removal. Such wear significantly compromises the plate’s metrological integrity and requires professional intervention.
If you suspect the discoloration is not a stain but rather wear or etching, contact a professional calibration and resurfacing service. They can accurately assess the damage and determine if the surface plate can be re-lapped or repaired to restore its original accuracy. Attempting to “clean” etched or worn areas with harsh chemicals will only cause further damage.
Preventing stains with better workflows and barriers
The most effective strategy for surface plate stain removal is to prevent stains from happening in the first place. Implementing better workflows and utilizing simple physical barriers can significantly reduce the risk of contamination and prolong the life of your precision equipment. Proactive measures are always more cost-effective than reactive cleaning.
Establish clear work zones around your surface plate, designating areas for specific tasks like layout, inspection, or tool staging. This helps minimize the likelihood of staining agents, such as layout dye or oils, from inadvertently migrating onto the granite. A well-organized workspace is a cleaner workspace, reducing opportunities for accidental spills.
Use protective mats or covers when the surface plate is not actively in use or during tasks where spills are likely. A clean, non-abrasive mat can shield the granite from incidental contact with tools, liquids, or debris. This simple barrier offers excellent protection against dust and accidental splashes, preserving the granite porosity from unwanted penetration.
Institute a “clean hands” policy for anyone working directly with the surface plate. Requiring gloves or regular hand washing before handling workpieces on the plate can drastically reduce fingerprint and oil transfer. This practice also promotes general cleanliness throughout the shop, benefiting all precision equipment.
Ensure that all tools, especially those containing liquids like layout dye, are stored securely and away from the surface plate when not in immediate use. Implement a strict “no food or drink” rule in the immediate vicinity of the plate. Educating staff on these best practices creates a culture of care and reduces incidents requiring layout dye cleanup or other stain removal efforts.
Documenting incidents for repeat prevention
Effective stain prevention and surface plate stain removal are not just about individual cleaning efforts; they also involve learning from past incidents. Establishing a system for documenting every stain occurrence provides valuable data that can help improve workflows and prevent future problems. This systematic approach transforms isolated incidents into opportunities for continuous improvement.
Maintain a logbook or digital record specifically for your surface plates, noting any stains, their location, and the suspected source. Record the date of the incident, the type of stain (e.g., layout dye, oil, ink), and the specific area on the plate where it occurred. This detailed information helps in pattern recognition and root cause analysis.
Beyond identifying the stain, document the cleaning method used, including any approved cleaning agents, and the outcome of your efforts. Did the stain come out completely? Did it leave a ghost mark? Was the granite porosity affected? Recording these details helps you refine your cleaning protocols for different types of contamination.
Regularly review this documentation to identify recurring patterns or common culprits. For example, if you notice frequent layout dye cleanup is needed in a particular area, it might indicate a need for better protective barriers or different tool handling procedures. Data-driven insights are incredibly powerful for proactive maintenance.
Use the insights gained from your documentation to update your standard operating procedures for surface plate care. Share these findings and updated protocols with all personnel who interact with the surface plate. This ensures everyone understands best practices, contributing to a consistently clean and accurate metrology environment.
Conclusion
Maintaining a clean and precise granite surface plate is non-negotiable for accurate metrology and calibration. Stains, while inevitable in a busy shop, do not have to become permanent fixtures that compromise your measurements. With the right knowledge and careful application of approved cleaning agents, effective surface plate stain removal is entirely achievable.
Remember to always start with the least aggressive cleaning methods, identify the stain type accurately, and work to prevent spreading the contaminant further. Whether you are tackling stubborn layout dye cleanup or persistent oil haze, patience and precision in your cleaning efforts are just as important as in your measurements. Understanding granite porosity helps you choose the right approach for deep-seated marks.
Proactive prevention, through better workflows, physical barriers, and staff education, remains your strongest defense against stains. Regularly inspecting your surface plate and addressing spills immediately will save you significant time and effort in the long run. A clean surface plate is a happy surface plate, ready for its demanding tasks.
Finally, do not underestimate the power of documentation for continuous improvement in your shop’s cleanliness protocols. Learning from each incident helps refine your approach to surface plate care, ensuring your valuable granite calibration standards remain in top condition. Your commitment to cleanliness directly impacts the quality and reliability of your entire operation.
By integrating these strategies, you protect your investment, maintain measurement integrity, and foster a culture of precision in your workspace. Keep your surface plates spotless, and they will continue to provide the reliable foundation your metrology demands. This ongoing diligence pays dividends in consistent accuracy and reduced downtime.