A surface plate is the bedrock of precision measurement, a meticulously flat reference plane essential for accurate inspection and layout tasks. When this crucial tool suffers damage, even seemingly minor imperfections can compromise its integrity and, by extension, the quality of your work. Understanding when to attempt surface plate scratch repair and when to seek professional help is vital for maintaining measurement accuracy and extending the life of your equipment.
Many shop managers and machinists wonder if a small ding or scratch warrants immediate concern or if it is something they can address themselves. The temptation to perform a quick fix is understandable, especially when production schedules are tight. However, an ill-advised repair attempt can do more harm than good, potentially worsening the damage or creating new accuracy issues.
This article will guide you through assessing common types of surface plate damage, identifying what you can safely manage in-house, and recognizing when professional `surface plate scratch repair` or `granite chip repair` is absolutely necessary. Protecting your investment and ensuring continued precision relies on making informed decisions about its care.
Why “Small” Damage Can Affect Measurements
Even the tiniest scratch or chip on a surface plate can have a disproportionately large impact on measurement accuracy. This is because precision metrology relies on the plate’s absolute flatness to provide a true reference plane. Any deviation from this flatness, no matter how minute, introduces errors into your measurements.
Imagine setting a height gauge or indicator on a surface that isn’t perfectly flat; the instrument will register a different reading depending on its exact position. This inconsistency means you cannot trust the data you collect, leading to parts being rejected unnecessarily or, worse, accepted when they are actually out of tolerance. The entire purpose of a surface plate is to eliminate variables, and damage reintroduces them.
A small raised burr, for example, can lift a workpiece or measuring instrument off the true surface, creating a false reading. A tiny depression, on the other hand, can cause an instrument to dip slightly, again skewing the measurement. These seemingly insignificant changes accumulate quickly in high-precision work.
The cumulative effect of these micro-deviations can be substantial when measuring parts with tight tolerances, where errors of a few microns can mean the difference between an acceptable and an unacceptable component. Ignoring minor damage often leads to a gradual degradation of measurement quality, which can be hard to pinpoint until it causes significant problems. It is always better to address these issues proactively rather than waiting for them to impact your production.
Many people underestimate the sensitivity of metrology instruments and the critical role the surface plate plays as the foundation for all measurements. Maintaining the integrity of your surface plate is not just about aesthetics; it is about preserving the fundamental accuracy of your entire inspection process. Never dismiss small damage as unimportant, because it rarely is in this field.
Types of Damage: Scratches, Chips, Dings, and Raised Areas
Surface plates can suffer various forms of damage, each requiring a different approach to assessment and potential `surface plate scratch repair`. Understanding these distinct types is the first step toward deciding on the right course of action. Generally, we see scratches, chips, dings, and raised material as the most common issues.
A scratch is a linear abrasion, a chip involves missing material, a ding is a localized impact point, and raised areas result from displaced material that protrudes above the plate’s nominal surface. Each type presents unique challenges to the plate’s flatness and overall function. Knowing the difference helps you understand the likely impact on your measurements.
| Damage Type | Description | Primary Concern |
|---|---|---|
| Scratch | A linear groove or abrasion on the surface. | Can catch measuring tools or create false reference points. |
| Chip | A small piece of material broken away from the edge or surface. | Removes reference material, can cause instability for tools. |
| Ding | An indentation caused by impact, often with surrounding raised material. | Creates both high and low spots, impacting flatness. |
| Raised Area | Material displaced upwards, often from a ding or impact. | Causes instruments/workpieces to ride high, directly affecting accuracy. |
| Wear Spot | A larger area where material has been slowly abraded away. | Creates a broad depression, reducing overall flatness in that region. |
How to Assess Severity Without Special Equipment
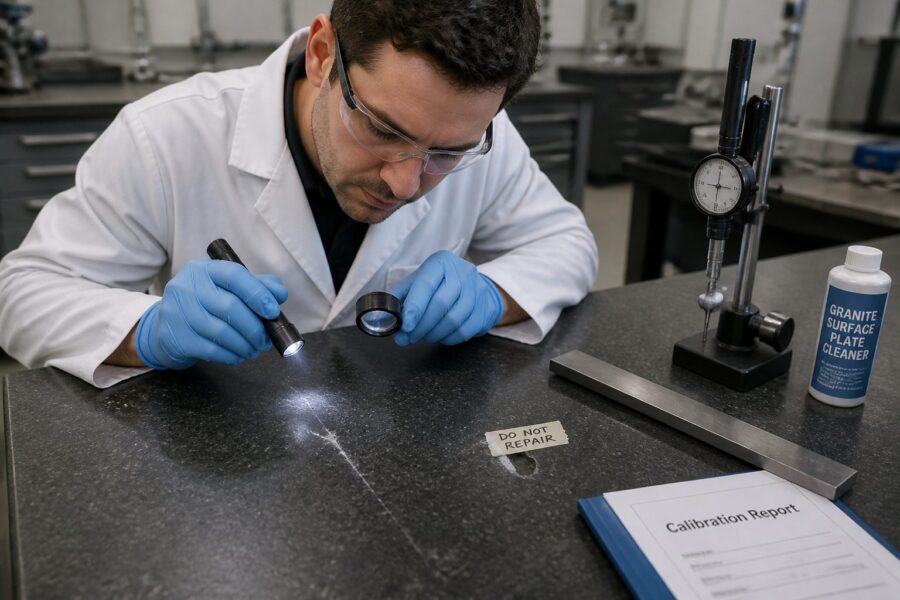
You do not always need sophisticated metrology tools to get a preliminary sense of damage severity on your surface plate. A keen eye and a few simple items can provide valuable insights into whether a scratch or ding is a minor cosmetic issue or a serious problem. This initial `damage assessment` helps you determine if professional intervention is required.
Start by thoroughly cleaning the damaged area to remove any grease, dust, or debris that might obscure the true nature of the imperfection. Use a clean cloth and a suitable granite cleaner, ensuring the surface is completely dry afterward. A clean surface makes it much easier to see fine details and actual material displacement.
For raised areas, gently run your fingernail across the affected spot; if you can feel a distinct bump, it is likely significant enough to affect measurements. Even a slight tactile sensation indicates that material is protruding above the reference plane, which will cause issues with any tool placed on it. This simple test is surprisingly effective for identifying problem spots.
Another useful technique involves using a precision straightedge or a known flat object, such as a ground machinist’s square. Place the straightedge over the damaged area and try to slide a thin feeler gauge or even a piece of paper underneath it. If you can detect a gap, it indicates a depression, and if the straightedge rocks, it points to a raised area.
For visual inspection, use a strong, focused light source, like a flashlight, and hold it at a very low angle across the surface. Shadows will highlight any raised areas, while light reflecting differently will reveal depressions or uneven wear. This low-angle lighting technique is a staple for visually inspecting flat surfaces for imperfections, making subtle flaws much more apparent. It helps you see the true topography of the plate.
What You Can Safely Do In-House (Minimal Intervention)
There are very few `surface plate scratch repair` tasks you can safely undertake yourself without specialized knowledge and equipment. The primary goal of any in-house intervention should be to prevent further damage and maintain existing accuracy, not to restore flatness. Think of these actions as damage control and maintenance, rather than true repair.
The most important thing you can do is keep your surface plate meticulously clean. Regular cleaning with a recommended granite cleaner removes abrasive particles that could cause future scratches. A clean plate also allows for accurate visual inspection, letting you spot issues before they escalate. This simple habit prevents many common problems.
For very minor, superficial scratches that do not create a measurable raised edge or depression, simply monitoring them is often the best course of action. If your fingernail does not catch on the scratch and a straightedge shows no light gap, it might be purely cosmetic. However, even cosmetic scratches can trap debris, so keep them clean.
If you identify a small, isolated raised burr from an impact, you might consider very carefully stoning it down. Use a fine-grit, non-loading machinist’s stone (often called a ‘surface plate stone’ or ‘burr stone’) with extremely light pressure and plenty of water or a suitable lubricant. The aim is to gently knock down the high spot without creating a new depression or altering the surrounding `surface conditioning`.
Always move the stone in multiple directions, using a circular or figure-eight motion, and check your progress frequently with a straightedge and your fingernail. The key is extreme caution and minimal material removal, stopping as soon as the raised area is no longer detectable. This is a delicate process, and over-stoning can quickly make the problem worse, so proceed with great care.
What Not to Do: Common DIY Mistakes
While the urge to fix a damaged surface plate quickly can be strong, many DIY `surface plate scratch repair` attempts lead to more severe and costly problems. Attempting repairs without proper knowledge, tools, or experience is a recipe for disaster. It is far better to leave certain repairs to the professionals than to permanently ruin your precision equipment.
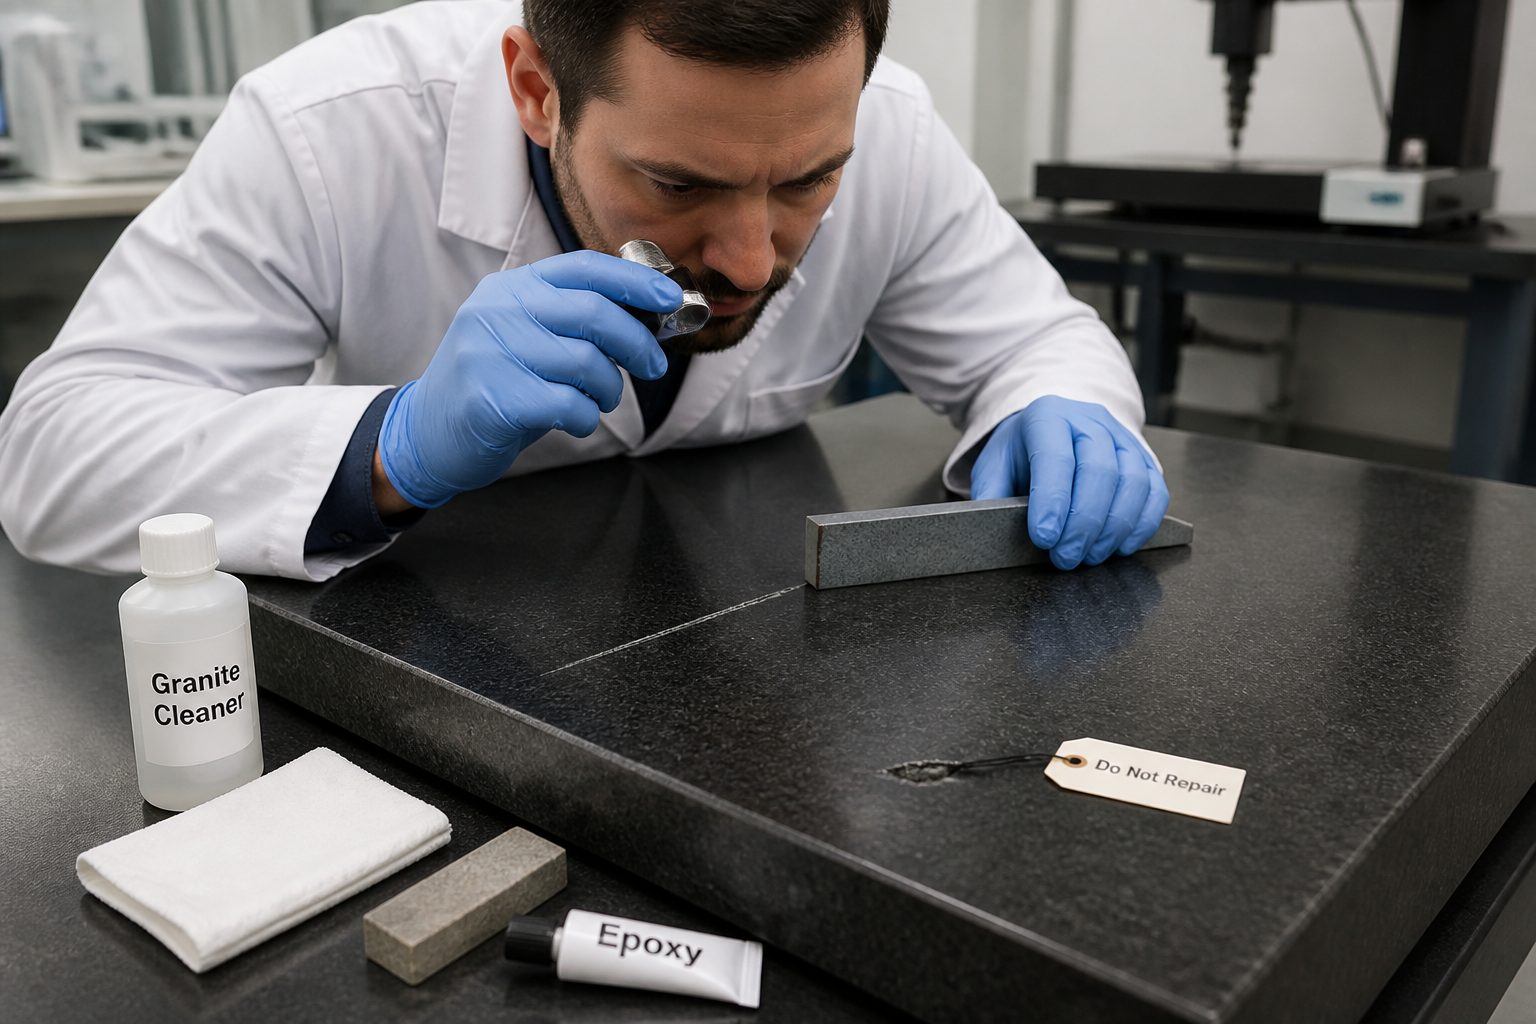
Never use abrasive sandpaper, grinding wheels, or power tools on your granite surface plate. These tools remove material uncontrollably and will quickly destroy the plate’s critical flatness. You will inevitably create uneven surfaces that are impossible to correct without professional reconditioning. These aggressive methods are completely inappropriate for precision granite.
- Using sandpaper or grinding tools
- Applying epoxy or fillers to chips
- Attempting to lap the entire surface
- Trying to “level” the plate with shims under damaged areas
- Using household cleaners with harsh chemicals
- Ignoring manufacturer recommendations for care
- Attempting to remove deep scratches with abrasive compounds
Raised Material vs Missing Material: Different Responses
The distinction between raised material and missing material on a surface plate is fundamental to deciding on an appropriate `surface plate scratch repair` strategy. These two types of damage demand entirely different responses, and confusing them can lead to further damage. Understanding this difference is critical for effective `damage assessment`.
Raised material, often a burr around a ding or impact point, means that granite has been displaced upward, creating a high spot above the plate’s nominal surface. This type of damage directly interferes with the contact between the plate and any object placed upon it, causing instruments to ride high and giving false readings. It is a direct impediment to accurate measurement.
Conversely, missing material, such as a chip or a deep scratch where granite has been removed, creates a low spot or a void in the surface. While a low spot does not actively push an instrument up, it can cause tools to dip, create unstable footing, or trap debris. A deep scratch can also catch the edge of a measuring instrument, preventing smooth movement.
For raised material, the limited in-house remedy involves very carefully stoning down the high spot to bring it flush with the surrounding surface. This is a subtractive process aimed at removing the excess material that protrudes. The goal is to eliminate the interference without creating a new low spot, which is a delicate balance to achieve.
For missing material, there is virtually no safe in-house `granite chip repair` solution that can restore the plate’s flatness. Filling a chip with epoxy or other compounds introduces a different material with different thermal expansion characteristics and wear properties, which will invariably lead to new accuracy problems over time. Professional reconditioning is the only viable solution for restoring flatness in areas of missing material, as it involves removing material from the entire surface to match the new lowest point, which is a significant undertaking.
When to Call for Professional Repair or Reconditioning
Knowing when to admit that a `surface plate scratch repair` is beyond your in-house capabilities is a sign of good judgment, not failure. Attempting to fix severe damage yourself will almost certainly cost you more in the long run, both in terms of repair costs and lost production due to inaccurate measurements. Professional reconditioning services exist for a reason.
You should immediately consider professional help if you have a deep scratch that your fingernail catches on, or a chip where a significant amount of material is missing. If a precision straightedge reveals a measurable gap or wobble over the damaged area, it is also a clear indicator that the plate’s flatness is compromised beyond simple intervention. These types of damage fundamentally alter the plate’s geometry.
Any damage that extends across a significant portion of the plate’s working area, or multiple smaller damages that collectively degrade the `surface conditioning`, warrants professional attention. It is not just about a single spot; the overall integrity of the reference plane is what matters most. A professional can assess the cumulative impact of all imperfections.
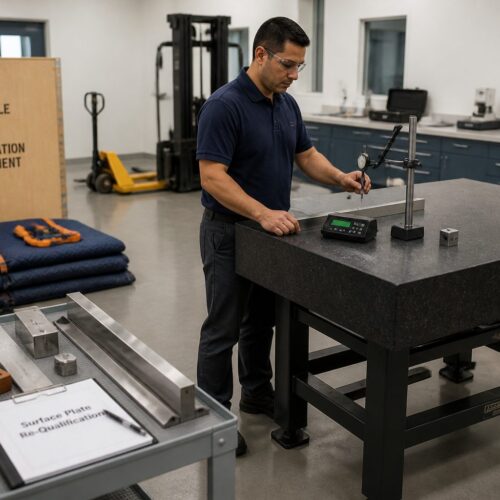
Furthermore, if your periodic calibration checks indicate that your surface plate is no longer within its specified flatness tolerance, even without obvious damage, it is time for professional reconditioning. Over time, normal wear and tear can cause a plate to lose its flatness, especially in high-use areas. This is a common occurrence that requires expert intervention to correct.
Professionals have the specialized equipment, such as autocollimators, electronic levels, and lapping machines, to accurately assess the plate’s overall flatness and precisely re-lap the surface. They can restore the plate to its original or even better-than-original specifications, something impossible to achieve with DIY methods. Trusting experts saves you from potential headaches and ensures your metrology remains reliable.
How Repairs Are Verified After Work Is Done
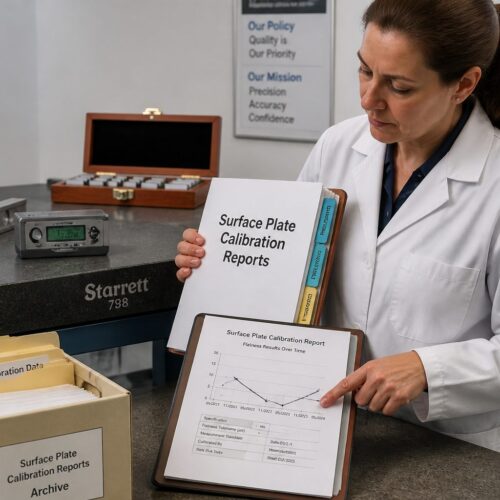
After a professional `surface plate scratch repair` or reconditioning, verification is a non-negotiable step to confirm the plate’s restored accuracy. You cannot simply assume the work was successful; rigorous testing ensures the plate meets its specified flatness tolerance. This verification process provides confidence in your measurement foundation.
The primary method for verifying flatness involves using an electronic level or an autocollimator in conjunction with a precision straightedge. These instruments measure minute angular deviations across the plate’s surface, allowing the technician to map its exact topography. The data collected reveals any high or low spots and confirms overall flatness within specified parameters.
Professional services typically perform these measurements in a controlled environment to minimize external influences like temperature fluctuations or vibrations. They will take readings at multiple points across the entire surface, often in a grid pattern, to generate a comprehensive flatness report. This detailed mapping is essential for proper `damage assessment` after repair.
The repair process culminates in the issuance of a calibration certificate, which states the plate’s flatness tolerance and the date of calibration. This certificate is your official record, proving that the plate meets industry standards like ANSI/ASME B89.3.7 or federal specification GGG-P-463c. Always request and keep this documentation.
When the plate returns to your facility, it is good practice to perform your own basic checks, like the straightedge and feeler gauge test, especially in the areas that were previously damaged. While not as precise as the professional methods, these checks offer immediate reassurance and help you build trust in the newly reconditioned surface. You should feel confident using your plate for critical measurements again.
Preventing Repeat Damage: Handling and Tool Habits
Preventing damage to your surface plate is far more cost-effective and less disruptive than any `surface plate scratch repair`. Implementing strict handling procedures and cultivating good tool habits are crucial for extending the life and maintaining the accuracy of your `granite calibration standards`. A proactive approach saves you headaches and money.
Always place workpieces and measuring instruments gently onto the surface plate; never drop or slide them aggressively. Impact is a primary cause of chips and dings, while dragging abrasive materials causes scratches. Treat the plate with the respect it deserves as a precision instrument, not just a workbench.
Use clean, burr-free tools and workpieces. Inspect the bottoms of all tools, gauges, and parts for sharp edges or embedded debris before placing them on the plate. Even a tiny metal shaving stuck to a gauge block can inflict a significant scratch when moved across the granite. This simple inspection prevents many incidents.
Keep the surface plate covered when not in use to protect it from falling objects, dust, and environmental contaminants. A sturdy, clean cover prevents accidental impacts and keeps airborne abrasives from settling on the `surface conditioning`. This is a small investment that yields big protective benefits.
Regularly clean the plate with a specialized granite cleaner to remove any accumulated dust, grit, or oily residue. A dirty surface not only compromises measurement accuracy but also increases the risk of abrasive wear and scratching when tools are moved across it. Maintaining cleanliness is a continuous process, not a one-time task.
Setting Rules for Plate Use in Shared Work Areas
In shared work environments, establishing clear rules and guidelines for surface plate use is absolutely essential to prevent damage and maintain accuracy. Without proper protocols, a single careless user can compromise a critical `granite calibration standard` for everyone. These rules protect your investment and ensure consistent quality across the team.
Designate specific individuals who are trained and authorized to use the surface plate for critical measurements. This limits access to those who understand its importance and proper handling. Untrained personnel are more likely to cause accidental damage, making controlled access a smart preventive measure.
Implement a strict “clean before and after use” policy for all users. Everyone should be responsible for wiping down the plate and their tools to remove debris that could cause scratches. This shared responsibility helps maintain the `surface conditioning` and reduces the risk of contamination.
Post clear instructions near the surface plate detailing proper handling, cleaning procedures, and a contact person for reporting any damage. Visual aids, like laminated posters, serve as constant reminders of best practices. Clear communication helps reinforce good habits among all users.
Establish a system for routine inspection and `damage assessment`, perhaps a daily or weekly check by a designated team member. This proactive approach helps catch minor issues before they escalate and ensures accountability. Regular checks keep everyone mindful of the plate’s condition.
Provide appropriate storage for tools and instruments that are used with the surface plate, ensuring they are not left directly on the granite when not in use. Dedicated racks or shadow boards prevent tools from being knocked over or causing impact damage. This organized approach minimizes clutter and potential hazards.
Conclusion
Your surface plate is a fundamental tool for precision, and its integrity directly impacts the quality of your work. Understanding the nuances of `surface plate scratch repair` and `granite chip repair` is not just about maintenance; it is about safeguarding your entire metrology process. Ignoring minor damage can lead to a cascade of inaccuracies, ultimately affecting your product quality and bottom line.
We have explored how even small imperfections can compromise measurements and differentiated between types of damage like scratches, chips, and raised areas. The ability to perform a basic `damage assessment` without specialized equipment empowers you to make initial, informed decisions about the severity of any issues. This initial understanding is key to taking the right next step.
While minimal in-house interventions, such as carefully stoning down a raised burr, are sometimes safe, most significant damage requires professional reconditioning. Attempting extensive DIY `surface plate scratch repair` often causes more harm than good, leading to permanent damage and increased costs. Professionals possess the expertise and equipment to restore your `granite calibration standards` to their original precision.
Remember that prevention is always the best strategy for maintaining your surface plate’s `surface conditioning`. Adopting strict handling protocols, keeping tools clean, and establishing clear usage rules in shared environments will drastically reduce the likelihood of damage. These habits foster a culture of precision and care within your workshop.
Ultimately, a well-maintained and accurately calibrated surface plate ensures reliable measurements, reduces waste, and upholds the quality standards of your operations. Do not compromise on the foundation of your precision work; invest in proper care and professional service when needed. Your commitment to accuracy starts with your surface plate.