Ensuring the accuracy of your measurements starts long before you place a part on the surface plate. A quick, routine granite surface plate inspection before use can prevent costly errors and maintain the integrity of your metrology setup. This simple habit protects your investment and guarantees reliable results every time you work.
Ignoring this crucial step leaves your precision work vulnerable to unseen contaminants or subtle damage. Even microscopic issues can throw off critical dimensions, leading to rejected parts or rework. A thorough visual inspection and surface cleanliness check are non-negotiable for any serious metrologist.
Developing a consistent pre-use routine is a cornerstone of effective damage prevention and maintaining calibration standards. It empowers operators to take ownership of their tools and uphold the highest quality benchmarks. Let’s walk through the essential steps for a comprehensive granite surface plate inspection before use.
What you’re looking for in a pre-use inspection
Your primary goal during a granite surface plate inspection before use is to identify anything that could compromise measurement accuracy. This includes visible damage, surface contamination, or any signs of instability. Think of this as a quick health check for your most fundamental metrology tool.
You want to confirm the plate is perfectly clean, free from any debris, and structurally sound. Even a tiny particle can lift a workpiece enough to introduce significant error into your readings. A meticulous visual inspection is your first line of defense against these common problems.
Operators should develop a keen eye for irregularities that might seem minor but have major implications. This involves scrutinizing the plate’s entire working surface and its edges. Damage prevention starts with early detection, so don’t dismiss small anomalies.
A consistent routine builds muscle memory, allowing you to quickly spot deviations from the plate’s normal condition. This proactive approach saves time and prevents the frustration of troubleshooting inaccurate measurements later on. It’s about being smart, not just fast, with your checks.
Ultimately, a robust pre-use inspection ensures that the granite surface plate provides the flat, stable, and clean reference plane it was designed for. This commitment to detail is what separates good metrology from truly exceptional work. Every measurement depends on this foundation of trust.
Understanding the common failure points helps guide your inspection efforts effectively. Focus on areas prone to impacts, wear, and debris accumulation, as these are often where problems first arise. This targeted approach makes your granite surface plate inspection before use much more efficient.
Lighting and viewing angles that reveal problems fast
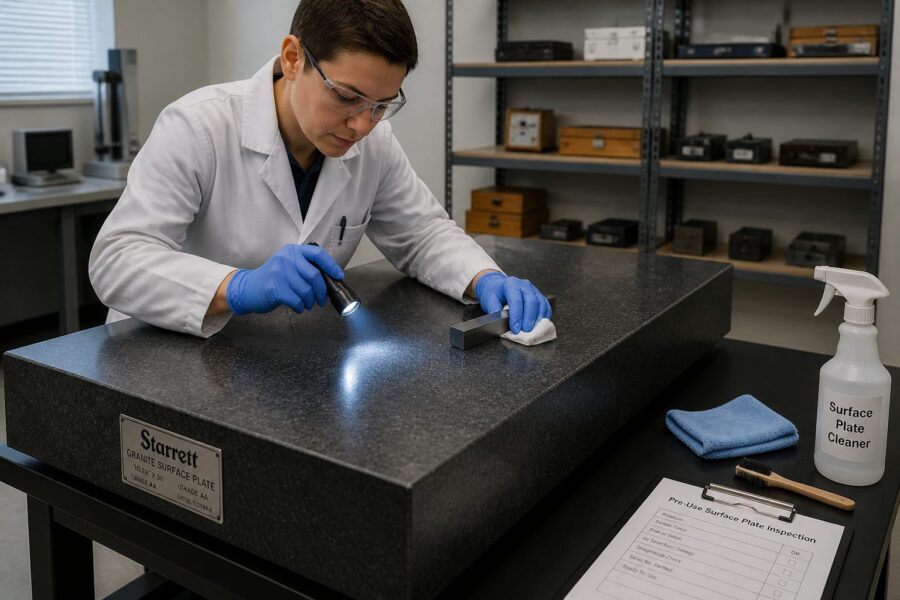
Effective lighting is your best friend when performing a visual inspection of a granite surface plate. Ambient shop lighting often isn’t enough to reveal subtle surface imperfections. You need to create conditions that actively highlight potential issues.
A strong, focused light source held at a very low angle across the plate’s surface works wonders. This technique causes any raised particles, scratches, or minor chips to cast distinct shadows. It’s like using a spotlight to find a needle on a stage.
Sweep the light source systematically across the entire plate, varying the angle slightly as you go. Look for any breaks in the uniform reflection of the light, as these indicate surface abnormalities. This method significantly enhances your visual inspection capabilities.
Changing your viewing angle is equally important; squat down and look across the plate at eye level. This perspective can reveal slight depressions or elevated areas that are invisible when viewed from directly above. It helps you see the true topography of the surface.
Don’t forget to inspect the edges and corners with the same critical lighting. These areas are particularly vulnerable to impact damage and can harbor hidden chips. A thorough granite surface plate inspection before use demands attention to every detail.
Consider using a small, handheld flashlight with a tight beam for pinpointing specific areas of concern. This allows for a more intense examination of any suspicious spots you initially detect. Good lighting truly makes all the difference in uncovering potential issues.
Checking for grit, burrs, and sticky residue
Contamination is a leading cause of measurement error and accelerated wear on granite surface plates. Grit, metal shavings, burrs, and sticky residues must be identified and removed immediately. A thorough surface cleanliness check is absolutely essential for precision.
Even a seemingly invisible film of oil or coolant can prevent a workpiece from seating properly, leading to inaccurate readings. These issues compromise the integrity of the reference plane and can transfer contaminants to your measuring instruments. This is a critical part of your granite surface plate inspection before use.
| Contaminant Type | Visual Inspection Sign | Tactile Clue (if safe) |
|---|---|---|
| Fine Grit/Dust | Hazy film, tiny specks, dull spots | Slightly rough or “sandy” feel |
| Metal Shavings/Burrs | Shiny, reflective particles, small protrusions | Sharp points, gritty resistance |
| Sticky Residue (oil, coolant) | Uneven sheen, dull patches, smudges | Tacky, gummy, or greasy feel |
| Dried Coolant/Stains | Discolored areas, crystalline deposits | Rough, crusty texture |
| Embedded Particles | Dark spots, raised bumps (under light) | Minor resistance when lightly dragged |
Feeling for raised spots safely (without scratching)
Visual inspection is powerful, but sometimes a tactile check is necessary to confirm subtle surface irregularities. You can safely feel for raised spots without risking damage to the plate or your hands. This technique adds another layer of scrutiny to your granite surface plate inspection before use.
Use the side of your clean, dry palm or the pads of your fingertips. Glide your hand lightly across the surface, paying attention to any slight resistance or bumps. This method allows you to detect contaminants or minor imperfections that might be missed by the eye alone.
Alternatively, a clean, lint-free cloth or a piece of thin paper can be dragged across the surface. Any raised spots or embedded grit will catch on the cloth or paper, providing a clear indication of a problem. This is a particularly safe way to perform a detailed surface cleanliness check.
Never use sharp objects or your fingernails to scrape at perceived imperfections. This can easily scratch the highly polished granite surface, creating new problems. Always prioritize damage prevention during your inspection process.
If you detect a raised spot, try to identify its nature: is it a loose particle, a sticky residue, or potentially a micro-burr on the granite itself? The type of irregularity dictates the appropriate cleaning or remediation step. A careful tactile assessment provides crucial diagnostic information.
Remember that even the slightest deviation from perfect flatness can impact your measurements, especially in high-precision applications. Trust your sense of touch as a valuable complement to your visual observations. This combined approach ensures a thorough and reliable granite surface plate inspection before use.
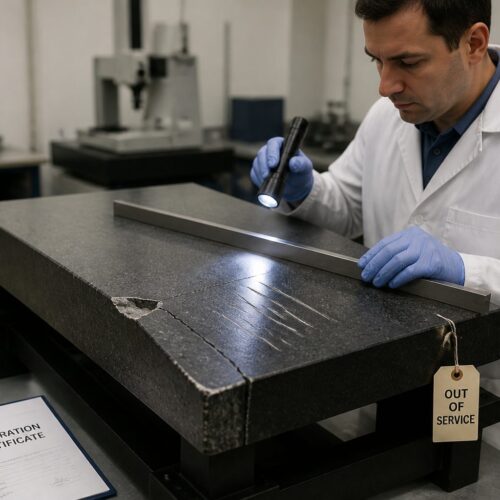
Spotting chips, edge damage, and corner impacts
Granite is incredibly durable, but it is not indestructible, especially at its edges and corners. These areas are prone to chipping from accidental impacts with tools, workpieces, or even careless handling. A critical part of damage prevention is actively looking for these vulnerabilities.
Chips along the working edge can compromise the accuracy of measurements taken against that edge. They also create potential stress points that could lead to further damage over time. Your granite surface plate inspection before use must include a meticulous examination of all perimeter areas.
Use your focused light source and varied viewing angles to scrutinize every inch of the plate’s perimeter. Even a small chip can act as a debris trap, making it harder to maintain a clean working surface. Early detection allows for appropriate action before bigger issues arise.
Corner impacts are particularly dangerous because they can propagate cracks into the main body of the plate. While a small corner chip might not directly affect the central working area, it signals rough handling that could have caused other, less visible issues. This calls for a careful visual inspection.
If you find any chips or cracks, assess their size and location. Minor edge chips away from critical working zones might be acceptable temporarily, but major damage or cracks extending into the measurement area warrant immediate attention. Documenting these findings is a good practice for tracking plate health.
Remember that damage to the plate’s structural integrity compromises its fundamental purpose as a stable reference. Promptly addressing these issues is paramount for maintaining the accuracy and lifespan of your granite surface plate. This vigilance is a key aspect of effective damage prevention.
Identifying “shine” and wear patterns from repeated use
Even with proper care, granite surface plates experience wear over time, especially in frequently used areas. This wear manifests as a subtle “shine” or polished appearance, contrasting with the plate’s original matte finish. Recognizing these patterns is a vital part of your granite surface plate inspection before use.
The shine indicates that the granite’s microscopic peaks have been worn down, reducing its ability to support a workpiece uniformly. This localized wear compromises the plate’s flatness and can introduce significant measurement errors. A thorough visual inspection reveals these critical changes.
- Look for areas that appear glossier or smoother.
- Compare frequently used zones with less-used perimeter areas.
- Use a low-angle light to highlight reflective patches.
- Note any consistent patterns where parts are often placed.
- Check for “runways” where instruments are frequently slid.
- Observe areas around fixture mounting points.
- Document the location and extent of any noticeable shine.
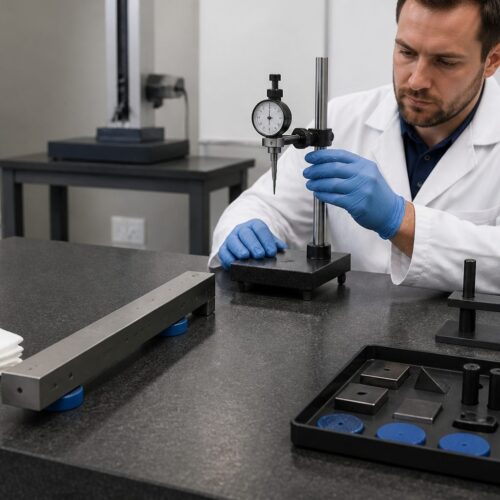
Verifying the plate is stable: rocking and stand contact
A granite surface plate is only as accurate as its foundation; any instability will directly translate into measurement errors. Ensuring the plate is perfectly stable and properly supported is a non-negotiable step in your pre-use routine. This check prevents frustrating and often hard-to-diagnose inaccuracies.
Begin by gently pressing down on various corners and the center of the plate. Listen and feel for any rocking, wobbling, or shifting. Even the slightest movement indicates an issue with the plate’s support or its leveling feet.
Inspect the contact points between the granite plate and its stand. Each support point should be making solid, even contact with the plate’s underside. Gaps or uneven pressure can lead to localized deflection and compromise overall flatness.
If your stand has adjustable leveling feet, ensure they are all properly engaged and supporting the plate without excessive tension on any single point. Over-tightening one foot can warp the plate, while loose feet cause instability. This is a critical aspect of damage prevention.
Check the floor beneath the stand as well; an uneven floor can transmit instability through the stand to the plate. Sometimes, simply repositioning the stand or shimming its feet can resolve rocking issues. A stable setup is fundamental to accurate metrology.
Never take plate stability for granted, even if it feels solid. The forces applied during measurement can reveal subtle rocking that wasn’t apparent during a casual touch. A thorough granite surface plate inspection before use always includes this critical stability check.
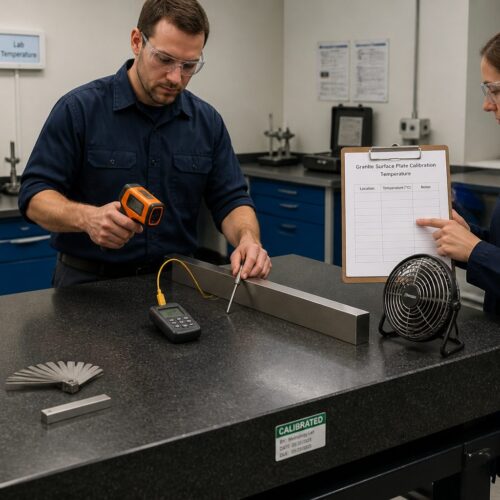
Remember that a surface plate is calibrated under specific support conditions. Deviating from these conditions can invalidate the calibration and introduce errors. Maintaining proper support is crucial for preserving the plate’s inherent accuracy.
Cleaning steps if you find contamination
Discovering contamination during your granite surface plate inspection before use means it’s time for immediate cleaning. Proper cleaning techniques are vital to remove debris without damaging the delicate surface. This ensures your surface cleanliness check yields positive results.
First, use a clean, soft brush or a specialized plate brush to gently sweep away any loose grit or dust. Always brush away from the working surface, ideally into a dustpan, to prevent re-depositing particles. This initial step is crucial for overall damage prevention.
Next, apply a small amount of a high-quality, non-abrasive granite surface plate cleaner to a clean, lint-free cloth. Avoid harsh chemicals or household cleaners, as these can damage the granite or leave residues. Specialized cleaners are formulated to be safe and effective.
Wipe the entire working surface in overlapping strokes, ensuring even coverage. Pay extra attention to any sticky residues or stubborn spots you identified during your visual inspection. Work methodically to cover the whole plate.
Immediately follow with a second clean, lint-free cloth dampened with distilled water to rinse away any cleaner residue. It is important to remove all traces of the cleaning agent. Residues can attract dust and compromise the plate’s surface integrity.
Finally, use a third dry, lint-free cloth to thoroughly dry the entire surface. Any lingering moisture can attract airborne particles or even cause microscopic etching over time. The goal is a perfectly clean, dry, and ready-to-use surface.
For embedded particles that resist wiping, a very fine, non-metallic abrasive stone designed for surface plates can sometimes be used with extreme caution. This should only be done by experienced personnel, as improper technique can cause more harm than good. When in doubt, call a professional.
Always store your cleaning supplies near the surface plate for easy access and consistent application. A well-maintained cleaning regimen extends the life of your plate and upholds measurement accuracy. This continuous surface cleanliness check is vital for metrology standards.
When to tag the plate out of service
Knowing when to remove a granite surface plate from service is as important as performing regular inspections. Continuing to use a compromised plate can lead to significant quality control issues and wasted production. Your granite surface plate inspection before use should empower this decision.
Any visible cracks that extend into the working area are an immediate red flag. Such cracks compromise the plate’s structural integrity and can lead to unpredictable deformation. This level of damage requires professional assessment or replacement.
Significant chipping along critical working edges, especially if it affects a large portion of the edge, also warrants tagging the plate out. These chips create an uneven reference for measurements taken against the edge. Damage prevention means taking these signs seriously.
If the plate exhibits noticeable rocking or instability that cannot be resolved by adjusting the stand, it’s a sign of a deeper problem. This could indicate a warped plate or a severely damaged stand, both of which render the plate unsuitable for precision work. A stable foundation is non-negotiable.
Excessive wear patterns, characterized by widespread “shine” or significant localized depressions, indicate a loss of flatness. While minor wear can sometimes be re-lapped, extensive degradation means the plate no longer meets its specified accuracy. A surface cleanliness check alone won’t fix this.
Finally, if a plate fails its scheduled calibration by an accredited laboratory, it must be tagged out of service until re-lapped or replaced. The calibration certificate is the ultimate authority on a plate’s accuracy. Trust the experts when they say it’s out of spec.
Do not attempt makeshift repairs on a damaged granite surface plate yourself. These delicate instruments require specialized tools and expertise for proper restoration or re-lapping. Prioritizing quality means knowing when to call in the professionals.
Clearly tag any out-of-service plate with a “DO NOT USE” sign and remove it from the working area. This prevents accidental use and ensures that only certified equipment is available for critical measurements. This is a crucial step in maintaining quality standards.
Building the routine into shift handoff
Making granite surface plate inspection before use a standard part of shift handoff transforms it from an optional task into an ingrained operational procedure. This ensures consistency and accountability across all shifts. It’s about building a culture of precision.
During shift changes, the outgoing operator should demonstrate the plate’s condition to the incoming operator. They can highlight any observations from their visual inspection or surface cleanliness check. This direct communication prevents misunderstandings and fosters shared responsibility.
Implement a simple checklist or logbook where operators can quickly document their pre-use inspection findings. This creates a traceable record of the plate’s condition over time. It also helps identify recurring issues or areas needing extra attention.
Training all operators on the proper inspection techniques is fundamental to this process. Everyone should understand what to look for, how to use lighting effectively, and when to clean or tag out a plate. Consistency in training leads to consistency in practice.
Designate specific cleaning supplies and tools for the surface plate and ensure they are always available and properly maintained. Lack of access to the right tools can be a barrier to consistent surface cleanliness checks. Make it easy for operators to do the right thing.
Regularly review the inspection logs to identify trends or areas for improvement. This data can inform maintenance schedules, re-lapping decisions, or even highlight training needs. It turns routine checks into valuable operational intelligence.
Empower operators to take immediate action if they find a problem, whether it’s cleaning the plate or tagging it out of service. They are the first line of defense against compromised measurements. This empowerment is central to effective damage prevention.
By integrating the granite surface plate inspection before use into daily operations, you reinforce the importance of metrology standards. This small investment of time yields significant returns in accuracy, quality, and equipment longevity. It simply becomes “how we do things here.”
Conclusion
A routine granite surface plate inspection before use is not merely a suggestion; it’s a fundamental requirement for anyone committed to precision metrology. This quick check protects your valuable equipment and, more importantly, safeguards the accuracy of your work. It’s a small investment with huge returns.
By consistently performing a visual inspection, a thorough surface cleanliness check, and looking for signs of damage or instability, you establish a foundation of reliability. This proactive approach prevents errors before they occur, saving time, money, and frustration. Precision starts with a clean, stable surface.
Adopting these habits ensures your granite surface plate remains a true reference standard, capable of delivering the accuracy your applications demand. It extends the life of your plate and minimizes the need for costly re-lapping or replacement. Damage prevention is always cheaper than repair.
Remember, your surface plate is the bedrock of your measurement system. Its condition directly impacts every reading you take. Treat it with the respect it deserves through diligent, routine checks.
Make this pre-use inspection an ingrained part of your daily workflow, and encourage others to do the same. This collective commitment to detail elevates the quality of work across your entire operation. It is a simple step with profound implications for accuracy.
A well-executed granite surface plate inspection before use means you can approach every measurement with confidence. You know your foundation is sound, your surface is clean, and your results are reliable. That peace of mind is invaluable in any precision environment.
Invest a few minutes at the start of each shift. This small effort contributes significantly to maintaining metrology standards and ensuring the longevity of your high-precision equipment. It is a smart practice for every professional.
The integrity of your measurements truly rests on the condition of your surface plate. By making this routine a priority, you’re not just inspecting a piece of granite; you’re upholding the very principles of accuracy and quality. It’s a commitment to excellence in every dimension.