A granite surface plate is the bedrock of precision measurement in any shop, providing an unyielding, flat reference plane. Maintaining its integrity is paramount for accurate work and long-term reliability in metrology.
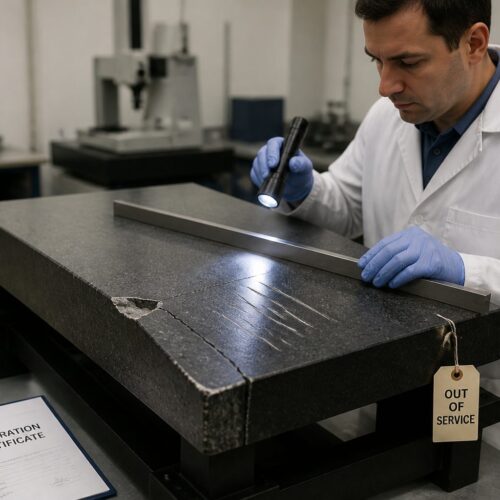
However, these incredibly precise tools are not invulnerable to damage from careless handling. Dings, scratches, and micro-fractures can compromise the plate’s flatness, leading to unreliable measurements and costly recalibrations.
Adopting disciplined habits for granite surface plate safe tool use is essential for preserving accuracy and extending the life of this critical piece of equipment. This guide outlines practical steps and best practices to ensure your granite surface plate remains a true and dependable reference for years to come.
Why “gentle” handling is a measurement skill
Many people view “gentle handling” as a soft skill, but in metrology, it is a fundamental measurement skill that directly impacts data integrity. A precise measurement begins long before you touch a gage to a part; it starts with how you interact with your tools and your granite surface plate.
Every small scratch or impact on the plate’s surface can introduce an error, no matter how tiny it might seem. These seemingly insignificant imperfections accumulate over time, ultimately degrading the plate’s certified flatness and making accurate readings impossible.
A ding might create a high spot, while a deep scratch can form a low channel, both distorting the true plane. When you measure a part on such a compromised surface, your readings will reflect these plate errors rather than the part’s actual dimensions. This introduces a hidden variable that undermines all subsequent measurements.
Understanding this direct link between careful handling and measurement accuracy transforms an abstract concept into a tangible responsibility. It means every time you place a gage or fixture, you are either preserving or diminishing the foundation of your work. This awareness is a cornerstone of granite surface plate safe tool use.
Mastering gentle handling truly separates a meticulous metrologist from someone merely going through the motions. It cultivates a respect for the precision instruments and the critical role they play in quality control. This mindset is crucial for maintaining the highest standards in any precision environment.
Ultimately, developing deliberate and careful habits around your granite surface plate is an investment in your measurement capability itself. It ensures that your results are trustworthy and that your equipment lasts as long as possible. The effort you put into careful handling pays off directly in consistent, reliable data.
Preparing parts: deburring, cleaning, and drying
Proper part preparation is the first line of defense against damaging your granite surface plate and ensuring accurate measurements. Skipping these critical steps introduces contaminants and potential hazards directly onto your precision reference surface.
Burrs, chips, and grit are the primary culprits for causing scratches and dings, acting like tiny abrasive tools when parts are moved across the plate. Even microscopic particles can embed themselves between a part and the plate, creating false readings and surface wear.
| Preparation Step | Purpose | Best Practice |
|---|---|---|
| Deburring | Remove sharp edges and loose material | Use a dedicated deburring tool or fine file; inspect thoroughly for remaining burrs. |
| Cleaning | Remove oil, coolant, dirt, and fine particles | Wash with appropriate solvent (e.g., isopropyl alcohol); use lint-free cloths. |
| Drying | Prevent residue and ensure stability | Air dry or wipe completely dry with a clean, lint-free cloth; avoid compressed air unless filtered and regulated. |
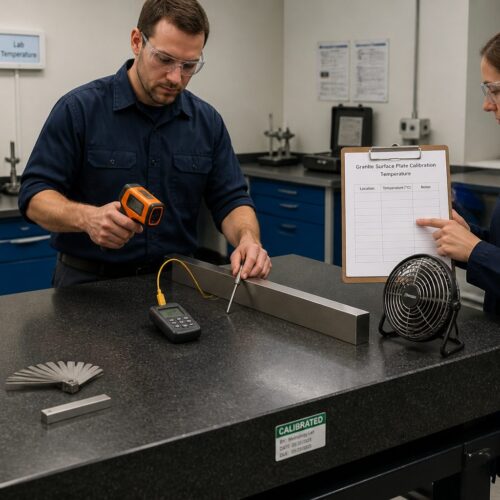
| Temperature Stabilization | Ensure part is at room temperature | Allow parts to acclimate to plate temperature for several minutes before measuring. |
| Visual Inspection | Catch any overlooked issues | Carefully examine all contact surfaces of the part before placing it on the plate. |
Setting tools down without sliding or dropping
One of the most common ways to damage a granite surface plate is by improperly placing tools and gages. The seemingly innocuous act of setting something down can cause significant harm if not done with deliberate care.
Avoid sliding tools across the granite surface plate at all costs, as any dust or grit trapped underneath acts as sandpaper, creating micro-scratches. These tiny abrasions accumulate over time, eventually compromising the plate’s flatness and overall accuracy.
Instead, lift tools completely off the surface before moving them to a new position. This simple habit prevents abrasive wear and preserves the critical flatness of your precision reference. Think of it as floating the tool above the surface rather than dragging it.
Dropping tools, even from a short height, can cause direct impact damage, resulting in dings or chips in the granite. Even a small chip can create a localized high spot, which will directly affect any measurements taken in that area.
Develop a habit of setting tools down gently, ensuring full control until they rest securely on the plate. This deliberate action minimizes kinetic energy and prevents accidental impacts. It is a fundamental aspect of granite surface plate safe tool use.
For heavier gages or fixtures, use both hands and carefully lower them into place. Never let gravity do the work of placing heavy items, as the sudden impact can create significant stress points. Always maintain full control until the item is settled.
Consider using a soft mat or staging block next to the surface plate for temporary tool storage. This provides a safe, non-damaging place to rest tools when they are not actively in use on the granite. It helps avoid clutter on the plate itself.
If a tool does accidentally drop, immediately inspect both the tool and the plate for any damage. Even if nothing is visible, a sudden impact can cause unseen stress fractures in the granite. Prompt inspection helps prevent compounding issues.
Using parallels, V-blocks, and fixtures without trapping grit
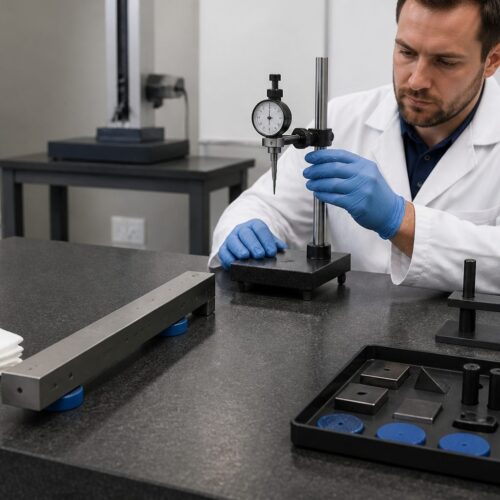
Parallels, V-blocks, and various fixtures are indispensable tools for supporting parts during inspection on a granite surface plate. However, their use presents a unique challenge: preventing grit and debris from becoming trapped between their contact surfaces and the granite.
Trapped grit acts as an abrasive, causing scratches and wear on both the fixture and the surface plate every time the fixture is moved or a part is loaded. This degrades accuracy over time and requires costly reconditioning of both components. It is a common cause of damage when proper care is not exercised.
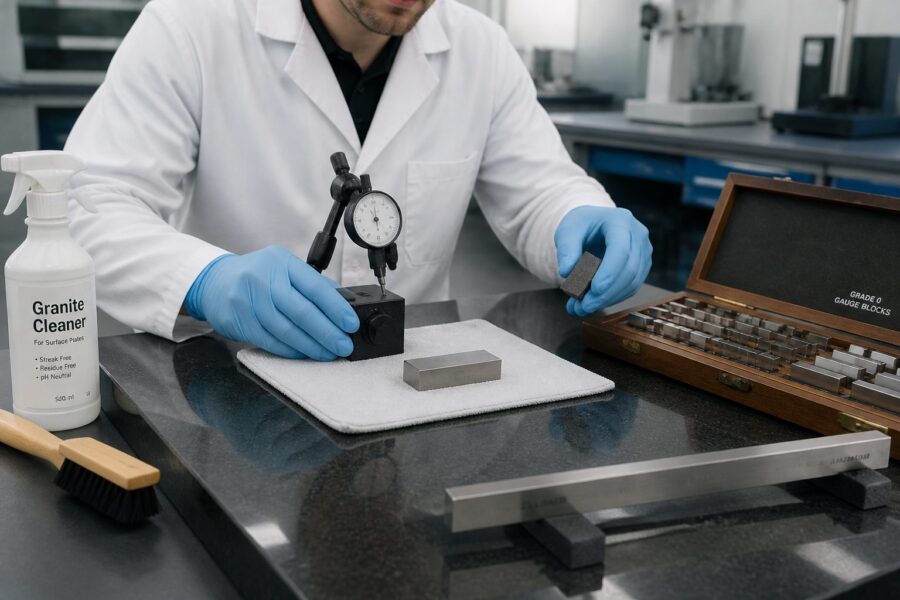
Before placing any fixture on the granite surface plate, thoroughly clean all contact surfaces of the fixture. Use a lint-free cloth and an appropriate cleaner to remove any dust, oil, or microscopic debris that might have accumulated. A quick wipe can prevent significant damage.
Similarly, wipe down the area of the granite surface plate where the fixture will rest. Even if the plate appears clean, a quick pass with a clean cloth ensures no stray particles are present. This dual cleaning approach dramatically reduces the risk of trapped grit.
When positioning parallels or V-blocks, lift them cleanly and place them precisely rather than sliding them into position. If minor adjustments are needed, lift and reposition rather than dragging, even for very small movements. This prevents any potential grinding action.
Regularly inspect your fixtures for wear, dings, or burrs on their contact faces. Damaged fixtures can directly transfer their imperfections to your granite surface plate, accelerating wear and compromising flatness. Replace or recondition worn fixtures promptly.
Consider using a thin, clean sheet of paper or a dedicated protector if a fixture is known to have a rough base or if its condition is uncertain. While not ideal for ultimate precision, this can offer temporary protection against severe scratching. Always prioritize clean, well-maintained fixtures, however.
Store parallels, V-blocks, and other fixtures in a clean, designated location when not in use. Covering them or placing them in protective cases prevents dust and debris from settling on their critical surfaces. This proactive storage keeps them ready for immediate, safe use without extra cleaning steps.
Managing heavy items: two-person lifts and staging blocks
Heavy parts, large fixtures, or substantial gages pose a significant risk to your granite surface plate if not handled correctly. The sheer weight, combined with potential sharp edges, can easily cause severe damage.
Never attempt to move or lift heavy items onto a granite surface plate alone if they are beyond your comfortable lifting capacity. A slip or loss of control can result in a catastrophic drop, potentially cracking the plate or causing deep gouges.
- Assess weight and shape before lifting
- Request assistance for heavy or awkward items
- Use mechanical aids like hoists or cranes when available
- Always use staging blocks for temporary placement
- Never slide heavy items across the granite
- Ensure a clear path to the surface plate
- Coordinate lifts with clear communication
Avoiding point loads and edge loading on granite
Granite surface plates are incredibly strong in compression, but they are vulnerable to concentrated forces, especially at their edges and corners. Understanding and avoiding point loads and edge loading is critical for preventing chips, cracks, and premature wear.
A point load occurs when a significant force is applied over a very small area, such as the sharp corner of a heavy part or the tip of a tool. This concentrated stress can exceed the granite’s localized strength, leading to chipping or even fracturing of the surface.
Always ensure that heavy items rest on a broad, flat base when placed on the surface plate. If a part has sharp corners or feet, use a protective intermediary layer, like a small, clean steel plate, to distribute the load more evenly. This spreads the pressure and minimizes the risk of damage.
Edge loading is particularly dangerous because the unsupported nature of the granite at its perimeter makes it more susceptible to chipping. Placing heavy items too close to the edge or allowing a part to cantilever off the plate increases the risk of damage.
Keep all parts and fixtures well within the usable central area of the granite surface plate, away from the vulnerable edges. Aim to distribute weight as centrally as possible to leverage the plate’s inherent strength. This habit prolongs the life of the plate.
Never use the edge of the surface plate as a hammering or striking surface, even for light tasks. The impact can easily cause a chip to break off, creating an irreparable flaw that compromises the entire measurement area. This is a common mistake for new users.
Be mindful of accessories like clamps or height gages with small bases. Ensure they are placed flat and securely, and avoid overtightening clamps directly on the granite surface. Use protective shims or pads if necessary to prevent direct pressure points.
Training new users about the dangers of point and edge loading should be a priority in any metrology lab. Emphasizing these specific vulnerabilities helps instill proper handling techniques from the very beginning. It forms a core tenet of granite surface plate safe tool use.
Keeping measuring faces clean: what to wipe and when
The accuracy of your measurements depends not only on a clean granite surface plate but also on the pristine condition of your measuring tools’ contact faces. Even microscopic debris on a gage can introduce significant errors into your readings.
Before every measurement, and certainly before placing any gage on the surface plate, meticulously wipe down its measuring faces. Use a clean, lint-free cloth, preferably one specifically designed for precision cleaning, to remove dust, oil, or fingerprints.
For tools like height gages, indicators, and micrometers, pay close attention to the anvil, spindle, and any contact points that will touch the part or the surface plate. Residue here acts as a spacer, creating false readings.
Consider using a small amount of isopropyl alcohol or a dedicated gage cleaner on your cloth for stubborn contaminants like dried coolant or grease. Ensure the tool is completely dry before making any measurements, as liquid residue can also affect readings.
Beyond cleaning the tools, it is equally important to periodically wipe down the working area of your granite surface plate. Fine dust settles constantly, and even invisible particles can interfere with the delicate contact between gage and surface.
A quick wipe of the plate before starting a new measurement sequence and again after a few parts have been inspected is a good routine. This proactive cleaning prevents the accumulation of debris that can scratch the plate or affect measurement repeatability.
Never use shop rags, paper towels, or any abrasive material to clean your precision tools or the granite surface plate. These materials often leave behind lint, fibers, or even fine abrasive particles that can do more harm than good. Only use approved lint-free cloths.
The habit of “wipe before you measure” should become second nature for anyone working in metrology. This small, consistent action contributes significantly to the accuracy and reliability of all your inspections. It is a simple yet powerful element of granite surface plate safe tool use.
Working with layout tools without staining or residue
Layout tools, such as scribers, height gages with carbide tips, and marking fluids, are essential for transferring designs or inspection points onto workpieces. However, their use requires careful consideration to prevent staining or leaving residue on your granite surface plate.
Carbide-tipped scribers, while excellent for marking metal, can leave faint gray lines on granite if dragged directly across the surface. These marks are not always easily removed and can accumulate, making the plate appear dirty and potentially obscuring true readings.
Always ensure that only the part being marked is in contact with the scriber tip, and lift the scriber completely when moving it to a new position. Never use the granite surface plate as a backing for scribing operations. This prevents accidental marks on the plate itself.
Layout fluid, also known as Dykem, is a common tool for enhancing visibility of scribed lines on metal. However, if spilled or allowed to drip onto the granite, it can leave stubborn blue stains that are difficult to remove completely without harsh chemicals.
Apply layout fluid away from the granite surface plate, preferably over a workbench or a dedicated spill tray. Allow the fluid to dry completely on the part before bringing it to the surface plate for marking. This simple precaution prevents accidental contamination.
If layout fluid does accidentally get on the granite, wipe it up immediately with a clean cloth and an appropriate solvent like isopropyl alcohol. Do not let it dry on the surface, as dried fluid requires more aggressive cleaning that could potentially affect the granite finish.
Similarly, certain pens or markers, especially permanent ones, can leave residues or dyes that absorb into the porous granite. Avoid marking anything directly on the granite surface plate with any kind of writing implement. Use paper notes or dedicated labels instead.
Educate all users about the potential for staining from layout materials and the best practices for their application. A proactive approach to managing these tools helps preserve the aesthetic and functional integrity of your granite surface plate. This is key for granite surface plate safe tool use.
End-of-job cleanup so the next user starts clean
A truly professional metrology environment operates on the principle that every user leaves the workspace better than they found it. This means a thorough end-of-job cleanup of the granite surface plate is not just good practice, but a critical part of maintaining precision standards.
Neglecting cleanup leaves behind dust, chips, oil, and other contaminants that can damage the plate or affect the next user’s measurements. This also fosters a culture of carelessness, which quickly degrades the quality of work performed in the area.
Begin by carefully removing all parts, gages, and fixtures from the granite surface plate. Lift each item cleanly, avoiding any sliding, and return it to its designated storage location. This clears the workspace for proper cleaning.
Use a specialized granite surface plate cleaner or a solution of mild detergent and water, applied with a clean, lint-free cloth. Work in small sections, wiping away any visible dirt, oil, or residue. Avoid harsh chemical cleaners, as they can potentially damage the granite or leave behind a film.
After cleaning, wipe the entire surface plate thoroughly with a clean, dry, lint-free cloth to remove all moisture and cleaning solution residue. Ensure the plate is completely dry, as residual moisture can attract dust and potentially lead to minor surface degradation over time.
Finally, place a protective cover over the granite surface plate if one is available. A dedicated cover shields the plate from airborne dust, accidental spills, and minor impacts when not in active use. This is a simple yet effective way to maintain its cleanliness and precision.
Organize and clean the immediate area around the surface plate, ensuring all tools are put away and the work area is tidy. A clean surrounding environment contributes to a clean plate and reduces the chance of reintroducing contaminants. This supports overall fixture cleanliness.
This routine end-of-job cleanup ensures that the next person to use the granite surface plate starts with a pristine, accurate reference. It reinforces a culture of shared responsibility and respect for precision equipment. This consistent practice is a cornerstone of granite surface plate safe tool use.
Training new users with a simple “do and don’t” list
Effective training for new users is paramount to protecting your investment in granite surface plates and maintaining measurement accuracy. A clear, concise “do and don’t” list provides actionable guidelines that are easy to understand and remember.
Simply telling someone to “be careful” is not enough; specific instructions on granite surface plate safe tool use prevent costly mistakes. This structured approach helps ingrain the correct habits from day one, reducing the learning curve and minimizing risks.
DO: Always clean parts thoroughly, including burr removal, before placing them on the plate. This prevents grit and sharp edges from scratching the precision surface. A clean part means a clean plate.
DON’T: Slide tools or gages across the granite surface plate. This grinds any trapped debris into the surface, causing irreparable scratches. Always lift and place instead of dragging.
DO: Lift and place all tools and gages gently and deliberately onto the plate. Maintain control until the item is fully settled to prevent accidental drops and impacts. This protects the granite from dings.
DON’T: Drop anything onto the surface plate, no matter how small or light it seems. Even minor impacts can cause chips or micro-fractures, compromising the plate’s flatness. Treat the plate with utmost respect.
DO: Use two people or mechanical assistance for heavy parts or fixtures. This prevents strain injuries and ensures heavy items are placed safely without risk of dropping or damaging the plate. Safety first, always.
DON’T: Place heavy items near the edges or corners of the surface plate. This creates dangerous point loads and edge loading, which can easily chip or crack the granite. Distribute weight evenly and centrally.
DO: Keep all measuring faces of gages and contact surfaces of fixtures meticulously clean. Any debris on these surfaces will interfere with accurate readings and potentially scratch the plate. Maintain excellent gage handling.
DON’T: Use layout fluid or permanent markers directly on the granite surface plate. These can leave stubborn stains that are difficult to remove and degrade the plate’s appearance. Work on a separate surface for layout.
DO: Clean the entire surface plate thoroughly after each use, removing all debris, oil, and fingerprints. This ensures the next user starts with a pristine, accurate reference surface. Your colleagues will appreciate it.
DON’T: Use abrasive materials like steel wool, sandpaper, or harsh chemical cleaners on the granite. These will damage the precision surface and compromise its flatness. Stick to approved granite cleaners and lint-free cloths.
Conclusion
Maintaining the integrity of a granite surface plate is not merely about preserving an expensive piece of equipment; it is about safeguarding the very foundation of precision measurement. Every ding, scratch, or stain directly impacts the reliability of your metrology. Adopting a rigorous approach to granite surface plate safe tool use is an investment in accuracy itself.
From meticulous burr removal and careful gage handling to thoughtful fixture cleanliness and proper heavy item management, each habit contributes to the longevity and precision of your plate. These practices are not optional; they are fundamental requirements for producing trustworthy data. By consistently adhering to these guidelines, you ensure that your granite surface plate remains a true and dependable reference for every critical measurement. A well-maintained plate reflects a commitment to quality that resonates through every aspect of your work.